Download presentation
Presentation is loading. Please wait.

1
제 8 장 그래픽 사용자 인터페이스 어서와 Java 는 처음이지 !

2
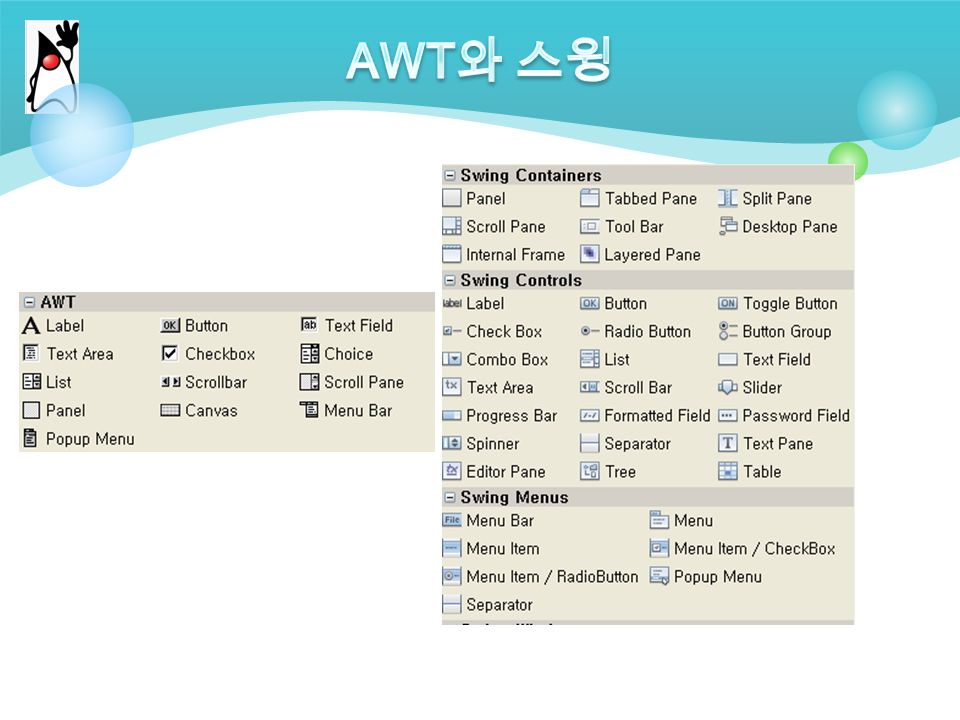
그래픽 사용자 인터페이스 (Graphical User Interface, 간단히 GUI) 는 컴포넌트들로 구성된다.
 는 컴포넌트들로 구성된다.")
3
GUI AWT(Abatract Windows Toolkit) SWING AWT 는 운영 체제가 제공하는 자원을 이용하여서 컴포넌트를 생성 컴포넌트가 자바로 작성되어 있기 때문에 어떤 플랫폼에서도 일관된 화면을 보여줄 수 있다.
 SWING AWT 는 운영 체제가 제공하는 자원을 이용하여서 컴포넌트를 생성 컴포넌트가 자바로 작성되어 있기 때문에 어떤 플랫폼에서도 일관된 화면을 보여줄 수 있다.")
5
AWT SWING

6
컴포넌트 AWT 버전스윙 버전 버튼 ButtonJButton 레이블 LabelJLabel 리스트 ListJList... 패스워드필드없음 JPasswordField 슬라이더없음 JSlider

9
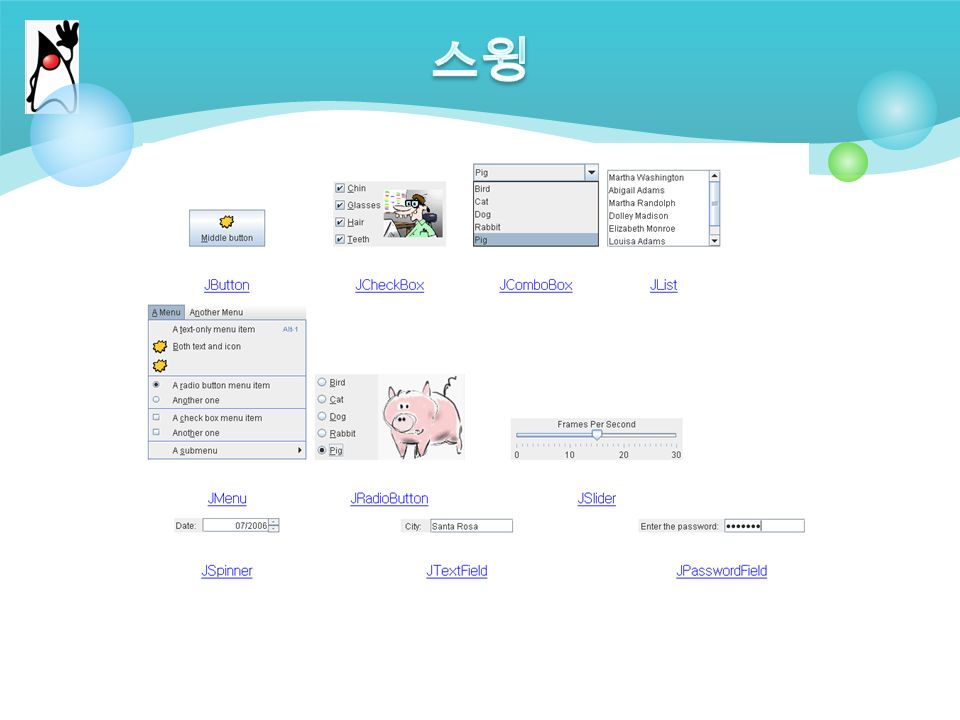
스윙 GUI 컴포넌트 형식화된 텍스트 입력이나 패스워드 필드 동작과 같은 복잡한 기능들이 제공된다. 자바 2D API 그림이나 이미지, 애니메이션 기능을 제공한다. 교체가능한 룩앤필 (Look-and-Feel) 지원 데이터 전송 자르기, 복사, 붙이기, 드래그앤 드롭 등의 데이터 전송 기능 제공 되돌리기 (undo) 와 되풀이 (redo) 기능을 손쉽게 제공
 지원 데이터 전송 자르기, 복사, 붙이기, 드래그앤 드롭 등의 데이터 전송 기능 제공 되돌리기 (undo) 와 되풀이 (redo) 기능을 손쉽게 제공.")
11
1. 그래픽 사용자 인터페이스를 구성하는 요소들을 무엇이라고 하는가 ? 2. AWT 와 스윙의 차이점은 무엇인가 ? 3. 되돌리기, 복사 및 붙여넣기 등도 스윙에서 제공되는가 ?

12
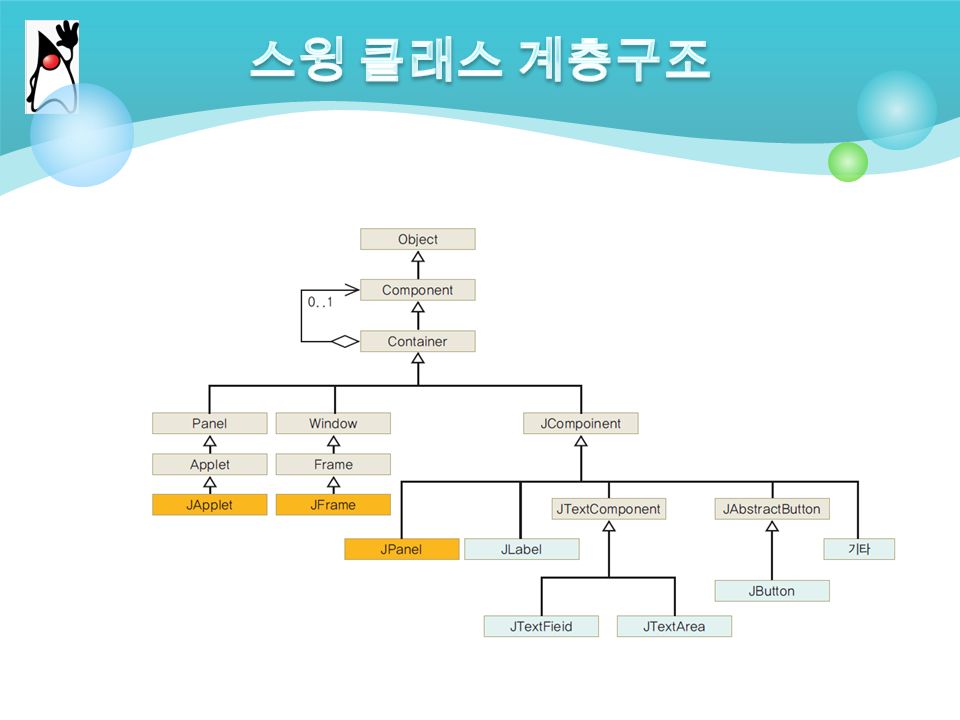
기본 컴포넌트 JButton, JLabel, JCheckbox, JChoice, JList, JMenu, JTextField, JScrollbar, JTextArea, JCanvas 등이 여기에 속한다. 컨테이너 컴포넌트 다른 컴포넌트를 안에 포함할 수 있는 컴포넌트로서 JFrame, JDialog, JApplet, JPanel, JScrollPane 등이 여기에 속한다.

13
최상위 컨테이너 : 절대 다른 컨테이너 안에 포함될 수 없는 컨테이너 를 의미한다. 프레임 (JFrame), 다이알로그 (JDialog), 애플릿 (JApplet) 등이 여기에 해당된다. 일반 컨테이너 : 다른 컨테이너 안에 포함될 수 있는 컨테이너로 패널 (JPanel), 스크롤 페인 (JScrollPane) 등을 의미한다.
, 다이알로그 (JDialog), 애플릿 (JApplet) 등이 여기에 해당된다. 일반 컨테이너 : 다른 컨테이너 안에 포함될 수 있는 컨테이너로 패널 (JPanel), 스크롤 페인 (JScrollPane) 등을 의미한다..")
15
import javax.swing.*; public class FrameTest { public static void main(String[] args) { JFrame f = new JFrame("Frame Test"); f.setSize(300, 200); f.setDefaultCloseOperation(JFrame.EXIT_ON_CLOSE); f.setVisible(true); } } JFrame 의 객체 생성
![import javax.swing.*; public class FrameTest { public static void main(String[] args) { JFrame f = new JFrame( Frame Test ); f.setSize(300, 200); f.setDefaultCloseOperation(JFrame.EXIT_ON_CLOSE); f.setVisible(true); } } JFrame 의 객체 생성](http://images.slidesplayer.org/40/11102770/slides/slide_15.jpg "import javax.swing.*; public class FrameTest { public static void main(String[] args) { JFrame f = new JFrame( Frame Test ); f.setSize(300, 200); f.setDefaultCloseOperation(JFrame.EXIT_ON_CLOSE); f.setVisible(true); } } JFrame 의 객체 생성")
16
import javax.swing.*; public class MyFrame extends JFrame { public MyFrame() { setSize(300, 200); setDefaultCloseOperation(JFrame.EXIT_ON_CLOSE); setTitle("MyFrame"); setVisible(true); } public class MyFrameTest { public static void main(String[] args) { MyFrame f = new MyFrame(); } MyFrame 의 객체 생성 Jframe 을 상속하여서 MyFrame 을 정의
![import javax.swing.*; public class MyFrame extends JFrame { public MyFrame() { setSize(300, 200); setDefaultCloseOperation(JFrame.EXIT_ON_CLOSE); setTitle( MyFrame ); setVisible(true); } public class MyFrameTest { public static void main(String[] args) { MyFrame f = new MyFrame(); } MyFrame 의 객체 생성 Jframe 을 상속하여서 MyFrame 을 정의](http://images.slidesplayer.org/40/11102770/slides/slide_16.jpg "import javax.swing.*; public class MyFrame extends JFrame { public MyFrame() { setSize(300, 200); setDefaultCloseOperation(JFrame.EXIT_ON_CLOSE); setTitle( MyFrame ); setVisible(true); } public class MyFrameTest { public static void main(String[] args) { MyFrame f = new MyFrame(); } MyFrame 의 객체 생성 Jframe 을 상속하여서 MyFrame 을 정의")
17
import javax.swing.*; public class MyFrame extends JFrame { public MyFrame() { setSize(300, 200); setDefaultCloseOperation(JFrame.EXIT_ON_CLOSE); setTitle("MyFrame"); setVisible(true); } public static void main(String[] args) { MyFrame f = new MyFrame(); } main() 이 MyFrame 안으로 이동 Jframe 을 상속하여서 MyFrame 을 정의
![import javax.swing.*; public class MyFrame extends JFrame { public MyFrame() { setSize(300, 200); setDefaultCloseOperation(JFrame.EXIT_ON_CLOSE); setTitle( MyFrame ); setVisible(true); } public static void main(String[] args) { MyFrame f = new MyFrame(); } main() 이 MyFrame 안으로 이동 Jframe 을 상속하여서 MyFrame 을 정의](http://images.slidesplayer.org/40/11102770/slides/slide_17.jpg "import javax.swing.*; public class MyFrame extends JFrame { public MyFrame() { setSize(300, 200); setDefaultCloseOperation(JFrame.EXIT_ON_CLOSE); setTitle( MyFrame ); setVisible(true); } public static void main(String[] args) { MyFrame f = new MyFrame(); } main() 이 MyFrame 안으로 이동 Jframe 을 상속하여서 MyFrame 을 정의")
18
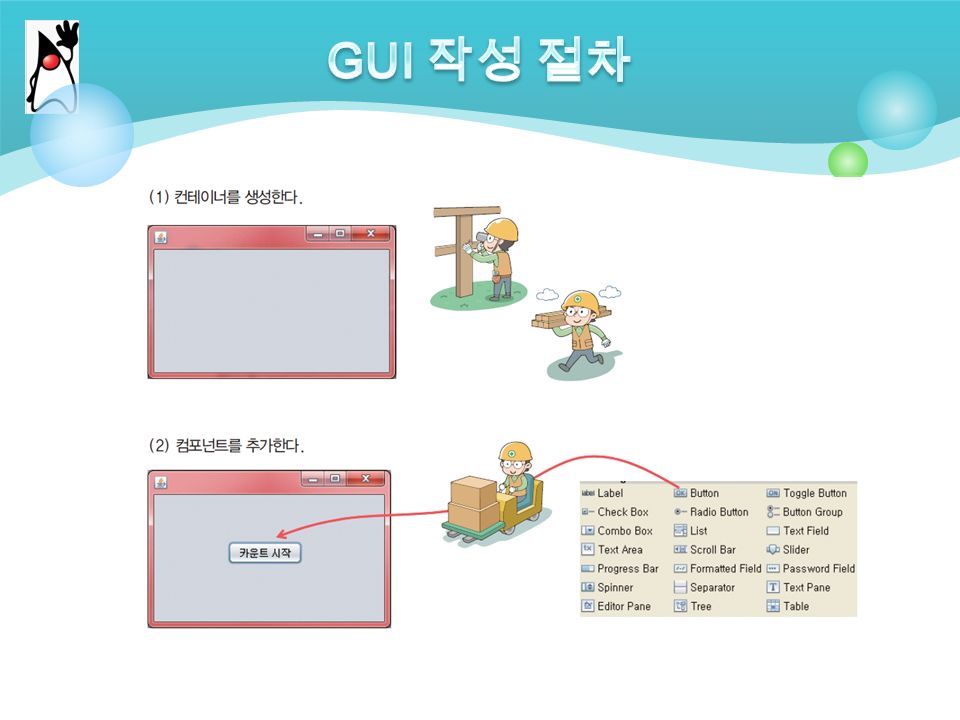
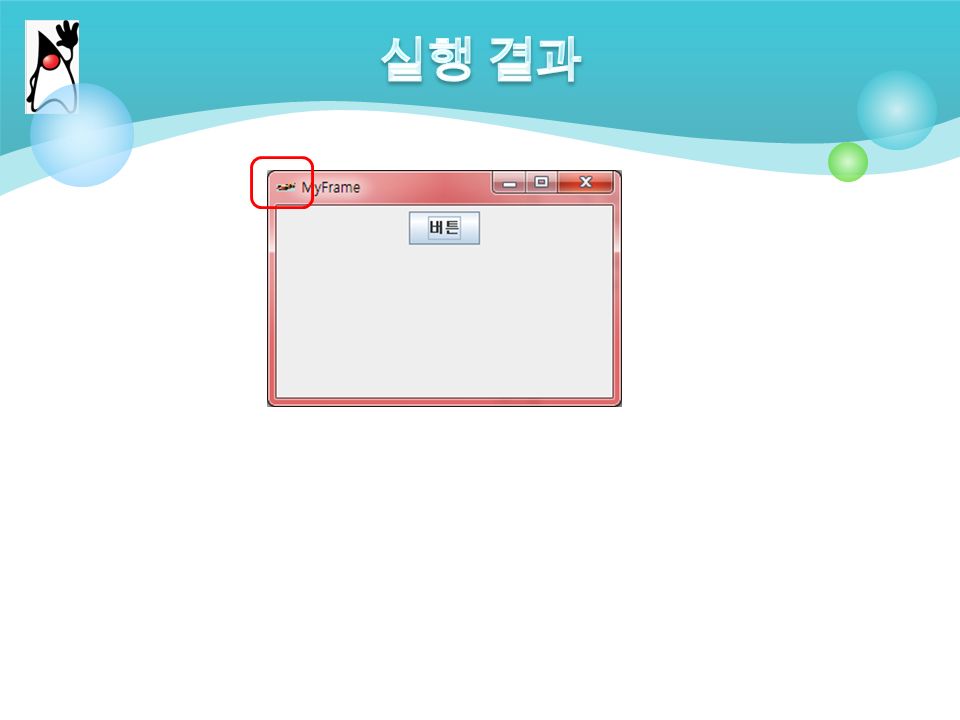
import javax.swing.*; import java.awt.FlowLayout; public class MyFrame extends JFrame { public MyFrame() { setSize(300, 200); setDefaultCloseOperation(JFrame.EXIT_ON_CLOSE); setTitle("MyFrame"); setLayout(new FlowLayout()); JButton button = new JButton(" 버튼 "); this.add(button); setVisible(true); } public class MyFrameTest { public static void main(String[] args) { MyFrame f = new MyFrame(); } 컴포넌트 생성 및 추가 배치 관리자 설정 !
![import javax.swing.*; import java.awt.FlowLayout; public class MyFrame extends JFrame { public MyFrame() { setSize(300, 200); setDefaultCloseOperation(JFrame.EXIT_ON_CLOSE); setTitle( MyFrame ); setLayout(new FlowLayout()); JButton button = new JButton( 버튼 ); this.add(button); setVisible(true); } public class MyFrameTest { public static void main(String[] args) { MyFrame f = new MyFrame(); } 컴포넌트 생성 및 추가 배치 관리자 설정 !](http://images.slidesplayer.org/40/11102770/slides/slide_18.jpg "import javax.swing.*; import java.awt.FlowLayout; public class MyFrame extends JFrame { public MyFrame() { setSize(300, 200); setDefaultCloseOperation(JFrame.EXIT_ON_CLOSE); setTitle( MyFrame ); setLayout(new FlowLayout()); JButton button = new JButton( 버튼 ); this.add(button); setVisible(true); } public class MyFrameTest { public static void main(String[] args) { MyFrame f = new MyFrame(); } 컴포넌트 생성 및 추가 배치 관리자 설정 !")
19
컨테이너는 컴포넌트들을 트리 (tree) 형태로 저장한다. 최상위 컨테이 너는 이 트리의 루트 노드가 된다. 최상위 컨테이너는 내부에 콘텐트 페인 (content pane) 을 가지고 있다. 여기에 화면에 보이는 컴포넌트를 저장한다. 최상위 컨테이너에는 메뉴바를 추가할 수 있다.
 을 가지고 있다. 여기에 화면에 보이는 컴포넌트를 저장한다. 최상위 컨테이너에는 메뉴바를 추가할 수 있다..")
20
프레임의 속성을 변경시키는 방법을 생각하여 보자. 조상 클래스들의 메소드도 사용할 수 있다 !

21
Component 컴포넌트 클래스는 화면에 표시되어서 사용자와 상호 작용하는 시각적인 객체를 나타낸다. Container 내부에 다른 컴포넌트를 추가할 수 있는 기능을 제공한다. 예를 들어서 이 클래스의 add() 를 사용하면 컨테이너 안에 컴포넌트를 추가할 수 있다. Window 경계선, 타이틀 바, 버튼을 가지고 있는 윈도우를 정의한다. Frame 자바 GUI 애플리케이션의 기초가 된다. JFrame Frame 클래스를 스윙의 출시에 맞추어 변경한 것이다.
 를 사용하면 컨테이너 안에 컴포넌트를 추가할 수 있다. Window 경계선, 타이틀 바, 버튼을 가지고 있는 윈도우를 정의한다. Frame 자바 GUI 애플리케이션의 기초가 된다. JFrame Frame 클래스를 스윙의 출시에 맞추어 변경한 것이다..")
22
setLocation(x, y), setBounds(x, y, width, height), setSize(width, height) 프레임의 위치와 크기를 설정한다. setIconImage(IconImage) 윈도우 시스템에 타이틀 바, 태스크 스위처에 표시할 아이콘을 알려준다. setTitle() 타이틀 바의 제목을 변경한다. setResizable(boolean) 사용자가 크기를 조절할 수 있는지를 설정한다.
 윈도우 시스템에 타이틀 바, 태스크 스위처에 표시할 아이콘을 알려준다. setTitle() 타이틀 바의 제목을 변경한다. setResizable(boolean) 사용자가 크기를 조절할 수 있는지를 설정한다..")
23
public class MyFrame extends JFrame { public MyFrame() { Toolkit kit = Toolkit.getDefaultToolkit(); Dimension screenSize = kit.getScreenSize(); setSize(300, 200); setLocation(screenSize.width / 2, screenSize.height / 2); setDefaultCloseOperation(JFrame.EXIT_ON_CLOSE); setTitle("MyFrame"); Image img = kit.getImage("icon.gif"); setIconImage(img); setLayout(new FlowLayout()); JButton button = new JButton(" 버튼 "); this.add(button); setVisible(true); }
 { Toolkit kit = Toolkit.getDefaultToolkit(); Dimension screenSize = kit.getScreenSize(); setSize(300, 200); setLocation(screenSize.width / 2, screenSize.height / 2); setDefaultCloseOperation(JFrame.EXIT_ON_CLOSE); setTitle( MyFrame ); Image img = kit.getImage( icon.gif ); setIconImage(img); setLayout(new FlowLayout()); JButton button = new JButton( 버튼 ); this.add(button); setVisible(true); }")
25
패널 (panel) 레이블 (label) 버튼 (button) 텍스트 필드 (text field)
 레이블 (label) 버튼 (button) 텍스트 필드 (text field)")
26
패널 (panel) 은 컴포넌트들을 포함하고 있도록 설계된 컨테이너 중의 하나이다
 은 컴포넌트들을 포함하고 있도록 설계된 컨테이너 중의 하나이다")
27
예를 들어서 다음과 같이 화면을 2 개로 나누어서 표시하고자 할 때 패 널을 사용할 수있다.

28
레이블 (Label) 은 편집이 불가능한 텍스트를 표시. new ( 예 ) JLabel label = new JLabel(“ 안녕하세요 ?”);
 은 편집이 불가능한 텍스트를 표시. new ( 예 ) JLabel label = new JLabel( 안녕하세요 );")
29
텍스트 필드 (text field) 는 입력이 가능한 한 줄의 텍스트 필드를 만드 는 데 사용
 는 입력이 가능한 한 줄의 텍스트 필드를 만드 는 데 사용")
30
JTextField - 기본적인 텍스트 필드 JFormattedTextField - 사용자가 입력할 수 있는 문자를 제한한다. JPasswordField - 사용자가 입력하는 내용이 보이지 않는다. JComboBox - 사용자가 직접 입력할 수도 있지만 항목 중에서 선택할 수 있다. JSpinner - 텍스트 필드와 버튼이 조합된 것으로 사용자는 이전 버튼 과 다음 버튼을 이용하여 선택할 수 있다.

31
버튼은 사용자가 클릭했을 경우, 이벤트를 발생하여 원하는 동작을 하게 하는데 이용된다

32
JButton - 가장 일반적인 버튼이다. JCheckBox - 체크박스 버튼 JRadioButton - 라디오 버튼으로 그룹 중의 하나의 버튼만 체크할 수 있다.

33
이제까지 학습한 내용을 바탕으로 화씨 온도를 섭씨 온도로 변환해주 는 애플리케이션을 작성하여 보자.

34
// 소스를 입력하고 Ctrl+Shift+O 를 눌러서 필요한 파일을 포함한다. public class Mylab { public static void main(String[] args) { JFrame f = new JFrame(); JPanel panel = new JPanel(); f.add(panel); JLabel label1 = new JLabel(" 화씨 온도 "); JLabel label2 = new JLabel(" 섭씨 온도 "); JTextField field1 = new JTextField(15); JTextField field2 = new JTextField(15); JButton button = new JButton(" 변환 ");
 { JFrame f = new JFrame(); JPanel panel = new JPanel(); f.add(panel); JLabel label1 = new JLabel( 화씨 온도 ); JLabel label2 = new JLabel( 섭씨 온도 ); JTextField field1 = new JTextField(15); JTextField field2 = new JTextField(15); JButton button = new JButton( 변환 );.")
35
panel.add(label1); panel.add(field1); panel.add(label2); panel.add(field2); panel.add(button); f.setSize(300, 150); f.setDefaultCloseOperation(JFrame. EXIT_ON_CLOSE); f.setTitle(" 온도변환기 "); f.setVisible(true); }
; f.setTitle( 온도변환기 ); f.setVisible(true); }.")
36
1. JFrame 을 상속받은 MyFrame 클래스를 작성하여 온도변화기를 다 시 작성하시오. 도 전도 전

37
패널 안에 다른 패널이 포함될 수 있다. 이것을 이용하여서 다음 그림 처럼 프로그램의 화면을 디자인하라.

39
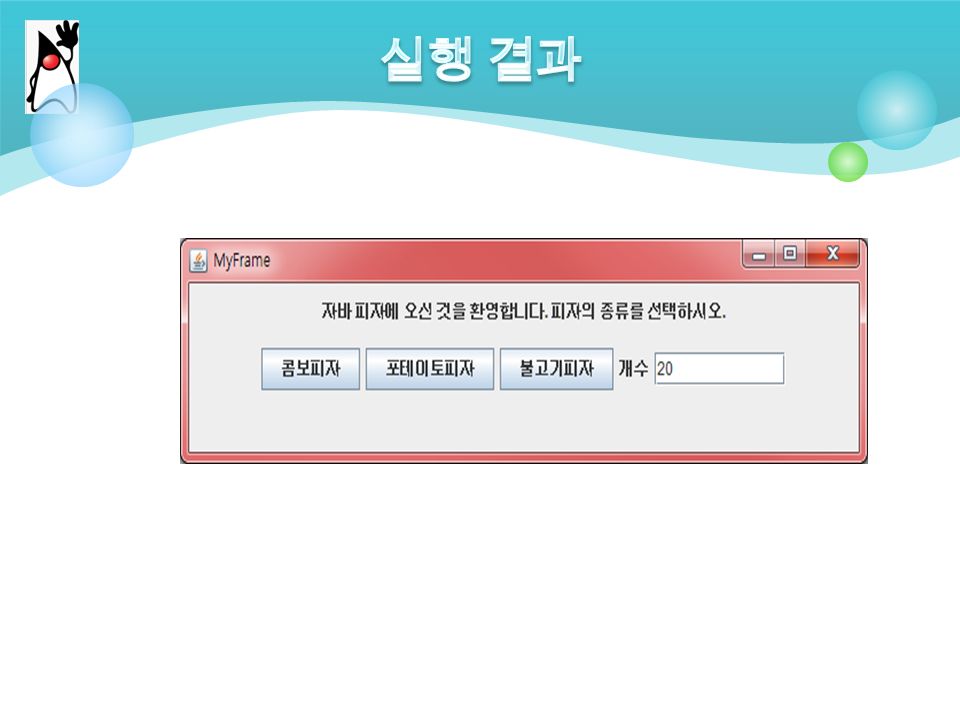
// 소스만 입력하고 Ctrl+Shift+O 를 누른다. public class MyFrame extends JFrame { public MyFrame() { setSize(600, 150); setDefaultCloseOperation(JFrame.EXIT_ON_CLOSE); setTitle("MyFrame"); JPanel panel = new JPanel(); JPanel panelA = new JPanel(); JPanel panelB = new JPanel(); JLabel label1 = new JLabel(" 자바 피자에 오신 것을 환영합니 다. 피자의 종류를 선택하시오."); panelA.add(label1);
 { setSize(600, 150); setDefaultCloseOperation(JFrame.EXIT_ON_CLOSE); setTitle( MyFrame ); JPanel panel = new JPanel(); JPanel panelA = new JPanel(); JPanel panelB = new JPanel(); JLabel label1 = new JLabel( 자바 피자에 오신 것을 환영합니 다. 피자의 종류를 선택하시오. ); panelA.add(label1);.")
40
JButton button1 = new JButton(" 콤보피자 "); JButton button2 = new JButton(" 포테이토피자 "); JButton button3 = new JButton(" 불고기피자 "); panelB.add(button1); panelB.add(button2); panelB.add(button3); JLabel label2 = new JLabel(" 개수 "); JTextField field1 = new JTextField(10); panelB.add(label2); panelB.add(field1); panel.add(panelA); panel.add(panelB); add(panel); setVisible(true); }
; JButton button2 = new JButton( 포테이토피자 ); JButton button3 = new JButton( 불고기피자 ); panelB.add(button1); panelB.add(button2); panelB.add(button3); JLabel label2 = new JLabel( 개수 ); JTextField field1 = new JTextField(10); panelB.add(label2); panelB.add(field1); panel.add(panelA); panel.add(panelB); add(panel); setVisible(true); }")
41
public class MyFrameTest { public static void main(String[] args) { MyFrame f = new MyFrame(); }
![public class MyFrameTest { public static void main(String[] args) { MyFrame f = new MyFrame(); }](http://images.slidesplayer.org/40/11102770/slides/slide_41.jpg "public class MyFrameTest { public static void main(String[] args) { MyFrame f = new MyFrame(); }")
42
패널의 배경색은 panel.setBackground(Color.BLUE); 와 같은 문장으 로 변경이 가능하다. 3 장의 패널 색상을 다르게 하여서 각각의 패널이 어디에 위치하는지를 조사하여 보자. import java.awt.Color; Color b=new Color(120,255,0); JPanel c=new Jpanel(); c.setBackground(b);
; JPanel c=new Jpanel(); c.setBackground(b);.")
43
Color.RED, Color.ORANGE, Color.YELLOW, Color.GREEN, Color.CYAN, Color.BLUE, Color.MAGENTA, Color.GRAY, Color.PINK, Color.LIGHT_GRAY

44
컨테이너 안의 각 컴포넌트의 위치와 크기를 결정하는 작업 [44/70]
![컨테이너 안의 각 컴포넌트의 위치와 크기를 결정하는 작업 [44/70]](http://images.slidesplayer.org/40/11102770/slides/slide_44.jpg "컨테이너 안의 각 컴포넌트의 위치와 크기를 결정하는 작업 [44/70]")
45
배치 관리자에 따라서 같은 애플리케이션도 상당히 다르게 보인다.

46
FlowLayout GridBagLayout GridLayout

47
BorderLayout BoxLayout CardLayout

48
생성자를 이용하는 방법 JPanel panel = new JPanel(new BorderLayout()); setLayout() 메소드 이용 panel.setLayout(new FlowLayout());
); setLayout() 메소드 이용 panel.setLayout(new FlowLayout());")
49
프로그래머가 컴포넌트의 크기와 힌트를 배치 관리자에게 주고 싶은 경우에는 setMinimumSize(), setPreferredSize(), setMaximumSize() 메소드를 사용 ( 예 ) button.setMaximumSize(new Dimension(300, 200)); // 최대 크기 힌트 button.setAlignmentX(JComponent.CENTER_ALIGNMENT);// 중앙 정렬 힌트
, setPreferredSize(), setMaximumSize() 메소드를 사용 ( 예 ) button.setMaximumSize(new Dimension(300, 200)); // 최대 크기 힌트 button.setAlignmentX(JComponent.CENTER_ALIGNMENT);// 중앙 정렬 힌트")
50
컴포넌트의 메소드인 setComponentOrientation() 을 사용하던지 applyComponentOrientation() 을 사용 ( 예 ) panel.applyComponentOrientation( ComponentOrientation.RIGHT_ TO_LEFT);
 을 사용하던지 applyComponentOrientation() 을 사용 ( 예 ) panel.applyComponentOrientation( ComponentOrientation.RIGHT_ TO_LEFT);")
51
컴포넌트들을 왼쪽에서 오른쪽으로 버튼을 배치한다. 패널과 애플릿의 디폴트 배치 관리자이다.

52
생성자설명 FlowLayout() 새로운 FlowLayout 객체를 생성한다. 기본 설정은 중앙 (center) 배치이며 간 격은 세로, 가로 각각 5 픽셀이다. FlowLayout(int align) 지정된 정렬 방식을 가진 새로운 FlowLayout 객체를 생성한다. 기본 설정은 중앙 (center) 배치이며 간격은 세로, 가로 각각 5 픽셀이다. 정렬 매개 변수는 다음 중 하나이다. FlowLayout.LEADING, FlowLayout.CENTER, FlowLayout.TRAILING. FlowLayout (int align, int hgap, int vgap) 지정된 정렬 방식과 수평 간격 hgap 과 수직 간격 vgap 을 가진 새로운 FlowLayout 객체를 생성한다.
 지정된 정렬 방식을 가진 새로운 FlowLayout 객체를 생성한다. 기본 설정은 중앙 (center) 배치이며 간격은 세로, 가로 각각 5 픽셀이다. 정렬 매개 변수는 다음 중 하나이다. FlowLayout.LEADING, FlowLayout.CENTER, FlowLayout.TRAILING. FlowLayout (int align, int hgap, int vgap) 지정된 정렬 방식과 수평 간격 hgap 과 수직 간격 vgap 을 가진 새로운 FlowLayout 객체를 생성한다..")
53
import java.awt.*; import javax.swing.*; class MyFrame extends JFrame { public MyFrame() { setTitle("FlowLayoutTest"); setDefaultCloseOperation(JFrame.EXIT_ON_CLOSE); JPanel panel; // 패널을 생성하고 배치 관리자를 FlowLayout 으로 설정 panel = new JPanel(); panel.setLayout(new FlowLayout(FlowLayout.CENTER)); // 패널에 버튼을 생성하여 추가 panel.add(new JButton("Button1")); panel.add(new JButton("Button2")); panel.add(new JButton("Button3")); panel.add(new JButton("B4")); panel.add(new JButton("Long Button5")); add(panel); pack();// The pack method packs the components within setVisible(true); // the window based on the component’s preferred sizes }
 { setTitle( FlowLayoutTest ); setDefaultCloseOperation(JFrame.EXIT_ON_CLOSE); JPanel panel; // 패널을 생성하고 배치 관리자를 FlowLayout 으로 설정 panel = new JPanel(); panel.setLayout(new FlowLayout(FlowLayout.CENTER)); // 패널에 버튼을 생성하여 추가 panel.add(new JButton( Button1 )); panel.add(new JButton( Button2 )); panel.add(new JButton( Button3 )); panel.add(new JButton( B4 )); panel.add(new JButton( Long Button5 )); add(panel); pack();// The pack method packs the components within setVisible(true); // the window based on the component’s preferred sizes }")
54
BorderLayout 은 5 개의 영역으로 구분하고 각각의 영역에 컴포넌트를 배치 PAGE_START ( 또는 NORTH) PAGE_END ( 또는 SOUTH) LINE_START ( 또는 WEST) LINE_END ( 또는 EAST) CENTER
 PAGE_END ( 또는 SOUTH) LINE_START ( 또는 WEST) LINE_END ( 또는 EAST) CENTER")
55
생성자 또는 메소드설명 BorderLayout(int hgap, int vgap) 컴포넌트 사이의 수평 간격 hgap 과 수직 간격 vgap 을 을 가 지는 BorderLayout 객체 생성 setHgap(int) 컴포넌트 사이의 수평 간격 설정 ( 단위는 픽셀 ) setVgap(int) 컴포넌트 사이의 수직 간격 설정
 컴포넌트 사이의 수평 간격 hgap 과 수직 간격 vgap 을 을 가 지는 BorderLayout 객체 생성 setHgap(int) 컴포넌트 사이의 수평 간격 설정 ( 단위는 픽셀 ) setVgap(int) 컴포넌트 사이의 수직 간격 설정")
56
import java.awt.*; import javax.swing.*; class MyFrame extends JFrame { public MyFrame() { setTitle("BorderLayoutTest"); setDefaultCloseOperation(JFrame.EXIT_ON_CLOSE); // 프레임은 디폴트로 BorderLayout 이므로 사실은 불필요 setLayout(new BorderLayout()); // 버튼을 추가한다. add(new JButton("Center"), BorderLayout.CENTER); add(new JButton("Line Start"), BorderLayout.LINE_START); add(new JButton("Line End"), BorderLayout.LINE_END); add(new JButton("Page Start"), BorderLayout.PAGE_START); add(new JButton("Page End"), BorderLayout.PAGE_END); pack(); setVisible(true); }
, BorderLayout.CENTER); add(new JButton( Line Start ), BorderLayout.LINE_START); add(new JButton( Line End ), BorderLayout.LINE_END); add(new JButton( Page Start ), BorderLayout.PAGE_START); add(new JButton( Page End ), BorderLayout.PAGE_END); pack(); setVisible(true); }.")
57
GridLayout 은 컴포넌트들을 격자 모양으로 배치한다.

58
생성자설명 GridLayout( int rows, int cols) rows 행과 cols 열을 가지는 GridLayout 객체를 생성 한다. 만약 rows 나 cols 가 0 이면 필요한 만큼의 행이 나 열이 만들어진다. GridLayout( int rows, int cols, int hgap, int vgap) rows 행과 cols 열을 가지는 GridLayout 객체를 생성 한다. hgap 과 vgap 은 컴포넌트 사이의 수평 간격과 수직 간격으로 단위는 픽셀이다.
 rows 행과 cols 열을 가지는 GridLayout 객체를 생성 한다. hgap 과 vgap 은 컴포넌트 사이의 수평 간격과 수직 간격으로 단위는 픽셀이다..")
59
import java.awt.*; import javax.swing.*; class MyFrame extends JFrame { public MyFrame() { setTitle("GridLayoutTest"); setDefaultCloseOperation(JFrame.EXIT_ON_CLOSE); setLayout(new GridLayout(0, 3));// 3 개의 열과 필요한 만큼의 행 add(new JButton("Button1")); add(new JButton("Button2")); add(new JButton("Button3")); add(new JButton("B4")); add(new JButton("Long Button5")); pack(); setVisible(true); }
 { setTitle( GridLayoutTest ); setDefaultCloseOperation(JFrame.EXIT_ON_CLOSE); setLayout(new GridLayout(0, 3));// 3 개의 열과 필요한 만큼의 행 add(new JButton( Button1 )); add(new JButton( Button2 )); add(new JButton( Button3 )); add(new JButton( B4 )); add(new JButton( Long Button5 )); pack(); setVisible(true); }")
60
// GridLayout 을 사용하여 아래와 같은 GUI 설 계 import javax.swing.*; import java.awt.*; public class TenColorButtonFrame extends JFrame{ TenColorButtonFrame(){ setTitle("Ten Color Button Frame"); setSize(500,200); setDefaultCloseOperation(JFrame.EXIT_ON_CLOSE); Container c = getContentPane(); c.setLayout(new GridLayout(1,10)); Color [] color = {Color.RED, Color.ORANGE, Color.YELLOW, Color.GREEN, Color.CYAN, Color.BLUE, Color.MAGENTA, Color.GRAY, Color.PINK, Color.LIGHT_GRAY}; for(int i=0;i<10;i++){ String text = Integer.toString(i); JButton button = new JButton(text); button.setOpaque(true); // 불투명 button.setBackground(color[i]); c.add(button); } setVisible(true); } public static void main(String[] args){ TenColorButtonFrame gl = new TenColorButtonFrame(); } }
![// GridLayout 을 사용하여 아래와 같은 GUI 설 계 import javax.swing.*; import java.awt.*; public class TenColorButtonFrame extends JFrame{ TenColorButtonFrame(){ setTitle( Ten Color Button Frame ); setSize(500,200); setDefaultCloseOperation(JFrame.EXIT_ON_CLOSE); Container c = getContentPane(); c.setLayout(new GridLayout(1,10)); Color [] color = {Color.RED, Color.ORANGE, Color.YELLOW, Color.GREEN, Color.CYAN, Color.BLUE, Color.MAGENTA, Color.GRAY, Color.PINK, Color.LIGHT_GRAY}; for(int i=0;i<10;i++){ String text = Integer.toString(i); JButton button = new JButton(text); button.setOpaque(true); // 불투명 button.setBackground(color[i]); c.add(button); } setVisible(true); } public static void main(String[] args){ TenColorButtonFrame gl = new TenColorButtonFrame(); } }](http://images.slidesplayer.org/40/11102770/slides/slide_60.jpg "// GridLayout 을 사용하여 아래와 같은 GUI 설 계 import javax.swing.*; import java.awt.*; public class TenColorButtonFrame extends JFrame{ TenColorButtonFrame(){ setTitle( Ten Color Button Frame ); setSize(500,200); setDefaultCloseOperation(JFrame.EXIT_ON_CLOSE); Container c = getContentPane(); c.setLayout(new GridLayout(1,10)); Color [] color = {Color.RED, Color.ORANGE, Color.YELLOW, Color.GREEN, Color.CYAN, Color.BLUE, Color.MAGENTA, Color.GRAY, Color.PINK, Color.LIGHT_GRAY}; for(int i=0;i<10;i++){ String text = Integer.toString(i); JButton button = new JButton(text); button.setOpaque(true); // 불투명 button.setBackground(color[i]); c.add(button); } setVisible(true); } public static void main(String[] args){ TenColorButtonFrame gl = new TenColorButtonFrame(); } }")
61
컴포넌트를 가능한 크게 나타내고 싶은 경우 GridLayout 이나 BorderLayout 을 사용 몇 개의 컴포넌트를 자연스러운 크기로 한 줄로 나타내고 싶은 경우 FlowLayout 을 사용하던지 BoxLayout 을 사용한다. 몇개의 컴포넌트를 행과 열로 동일한 크기로 나타내고 싶은 경우 GridLayout 을 사용하여야 한다. 몇개의 컴포넌트를 행과 열로 나타내는데 각 컴포넌트의 크기가 다르 거나 간격, 정렬 방식을 다르게 내고 싶은 경우 BoxLayout 을 사용하면 된다.

62
배치 관리자를 null 로 설정한다. null setlayout(null); add() 메소드를 사용하여 컴포넌트를 컨테이너에 추가한다. Button b = Button("Absolute Position Button"); add(b); setBounds() 메소드를 사용하여 절대 위치와 크기를 지정한다. b.setBounds(x, y, w, h); 컴포넌트의 repaint() 메소드를 호출한다. b.repaint();
; add(b); setBounds() 메소드를 사용하여 절대 위치와 크기를 지정한다. b.setBounds(x, y, w, h); 컴포넌트의 repaint() 메소드를 호출한다. b.repaint();.")
63
import java.awt.*; import java.awt.event.*; import javax.swing.*; class MyFrame extends JFrame { JButton b1; private JButton b2, b3; public MyFrame() { setTitle("Absolute Position Test"); setDefaultCloseOperation(JFrame.EXIT_ON_CLOSE); setSize(300, 200); JPanel p = new JPanel(); p.setLayout(null); b1 = new JButton("Button #1"); p.add(b1); b2 = new JButton("Button #2"); p.add(b2); b3 = new JButton("Button #3"); p.add(b3);
 { setTitle( Absolute Position Test ); setDefaultCloseOperation(JFrame.EXIT_ON_CLOSE); setSize(300, 200); JPanel p = new JPanel(); p.setLayout(null); b1 = new JButton( Button #1 ); p.add(b1); b2 = new JButton( Button #2 ); p.add(b2); b3 = new JButton( Button #3 ); p.add(b3);")
64
b1.setBounds(20, 5, 95, 30); b2.setBounds(55, 45, 105, 70); b3.setBounds(180, 15, 105, 90); add(p); setVisible(true); } public class AbsoluteTest { public static void main(String args[]) { MyFrame f=new MyFrame(); }
![b1.setBounds(20, 5, 95, 30); b2.setBounds(55, 45, 105, 70); b3.setBounds(180, 15, 105, 90); add(p); setVisible(true); } public class AbsoluteTest { public static void main(String args[]) { MyFrame f=new MyFrame(); }](http://images.slidesplayer.org/40/11102770/slides/slide_64.jpg "b1.setBounds(20, 5, 95, 30); b2.setBounds(55, 45, 105, 70); b3.setBounds(180, 15, 105, 90); add(p); setVisible(true); } public class AbsoluteTest { public static void main(String args[]) { MyFrame f=new MyFrame(); }")
65
간단한 계산기를 작성하여 보자. 계산 기능은 나중에 추가하기로 하 자. 여기서는 다음과 같은 외관만 구현하면 된다.GridLayout 을 사용 하여 보자.

66
// 소스만 입력하고 Ctrl+Shift+O 를 누른다. public class Calculator extends JFrame { private JPanel panel; private JTextField tField; private JButton[] buttons; private String[] labels = { "Backspace", "", "", "CE", "C", "7", "8", "9", "/", "sqrt", "4", "5", "6", "x", "%", "1", "2", "3", "-", "1/x", "0", "+/-", ".", "+", "=", };

67
public Calculator() { tField = new JTextField(35); panel = new JPanel(); tField.setText("0."); tField.setEnabled(false); panel.setLayout(new GridLayout(0, 5, 3, 3)); buttons = new JButton[25]; int index = 0; for (int rows = 0; rows < 5; rows++) { for (int cols = 0; cols < 5; cols++) { buttons[index] = new JButton(labels[index]); if( cols >= 3 ) buttons[index].setForeground(Color.red); else buttons[index].setForeground(Color.blue); buttons[index].setBackground(Color.yellow); panel.add(buttons[index]); index++; }
![public Calculator() { tField = new JTextField(35); panel = new JPanel(); tField.setText( 0. ); tField.setEnabled(false); panel.setLayout(new GridLayout(0, 5, 3, 3)); buttons = new JButton[25]; int index = 0; for (int rows = 0; rows < 5; rows++) { for (int cols = 0; cols < 5; cols++) { buttons[index] = new JButton(labels[index]); if( cols >= 3 ) buttons[index].setForeground(Color.red); else buttons[index].setForeground(Color.blue); buttons[index].setBackground(Color.yellow); panel.add(buttons[index]); index++; }](http://images.slidesplayer.org/40/11102770/slides/slide_67.jpg "public Calculator() { tField = new JTextField(35); panel = new JPanel(); tField.setText( 0. ); tField.setEnabled(false); panel.setLayout(new GridLayout(0, 5, 3, 3)); buttons = new JButton[25]; int index = 0; for (int rows = 0; rows < 5; rows++) { for (int cols = 0; cols < 5; cols++) { buttons[index] = new JButton(labels[index]); if( cols >= 3 ) buttons[index].setForeground(Color.red); else buttons[index].setForeground(Color.blue); buttons[index].setBackground(Color.yellow); panel.add(buttons[index]); index++; }")
68
add(tField, BorderLayout.NORTH); add(panel, BorderLayout.CENTER); setVisible(true); pack(); } public static void main(String args[]) { Calculator s = new Calculator(); }
![add(tField, BorderLayout.NORTH); add(panel, BorderLayout.CENTER); setVisible(true); pack(); } public static void main(String args[]) { Calculator s = new Calculator(); }](http://images.slidesplayer.org/40/11102770/slides/slide_68.jpg "add(tField, BorderLayout.NORTH); add(panel, BorderLayout.CENTER); setVisible(true); pack(); } public static void main(String args[]) { Calculator s = new Calculator(); }")
69
실행 결과를 참조하여서 다음 코드의 빈칸을 채우고 실행하여 보라.

70
import java.awt.FlowLayout; import javax.swing.*; public class MyFrame extends JFrame { JPanel p1; public MyFrame() { setSize(300, 200); setTitle("My Frame"); p1 = new JPanel(); p1.setLayout(new FlowLayout()); for (int i = 0; i < 10; i++) p1.add(new JButton("Button" + i)); add(p1); setVisible(true); // 프레임을 화면에 표시한다. }

71
public class MyFrameTest { public static void main(String args[]) { MyFrame f = new MyFrame(); } P.391 도전 !!!!!!!!!!!!!!!!(GridLayout)
![public class MyFrameTest { public static void main(String args[]) { MyFrame f = new MyFrame(); } P.391 도전 !!!!!!!!!!!!!!!!(GridLayout)](http://images.slidesplayer.org/40/11102770/slides/slide_71.jpg "public class MyFrameTest { public static void main(String args[]) { MyFrame f = new MyFrame(); } P.391 도전 !!!!!!!!!!!!!!!!(GridLayout)")
72
다음과 같이 난수를 발생하여서 레이블을 불규칙하게 배치하여 보자.

73
public class MyFrame extends JFrame { JPanel p = new JPanel(); JLabel[] labels = new JLabel[30]; public MyFrame() { p.setLayout(null); p.setBackground(Color.YELLOW); for (int i = 0; i < 30; i++) { labels[i] = new JLabel("" + i); int x = (int) (500 * Math.random()); int y = (int) (200 * Math.random()); labels[i].setForeground(Color.MAGENTA); labels[i].setLocation(x, y); labels[i].setSize(20, 20); p.add(labels[i]); } setSize(500, 300); add(p); setVisible(true); // 프레임을 화면에 표시한다. }
![public class MyFrame extends JFrame { JPanel p = new JPanel(); JLabel[] labels = new JLabel[30]; public MyFrame() { p.setLayout(null); p.setBackground(Color.YELLOW); for (int i = 0; i < 30; i++) { labels[i] = new JLabel( + i); int x = (int) (500 * Math.random()); int y = (int) (200 * Math.random()); labels[i].setForeground(Color.MAGENTA); labels[i].setLocation(x, y); labels[i].setSize(20, 20); p.add(labels[i]); } setSize(500, 300); add(p); setVisible(true); // 프레임을 화면에 표시한다.](http://images.slidesplayer.org/40/11102770/slides/slide_73.jpg "}.")
74
public class MyFrameTest { public static void main(String args[]) { MyFrame f = new MyFrame(); }
![public class MyFrameTest { public static void main(String args[]) { MyFrame f = new MyFrame(); }](http://images.slidesplayer.org/40/11102770/slides/slide_74.jpg "public class MyFrameTest { public static void main(String args[]) { MyFrame f = new MyFrame(); }")
75
계산기 GUI 설계 !( 도전 )
")
Similar presentations


>")


