Download presentation
Presentation is loading. Please wait.

1
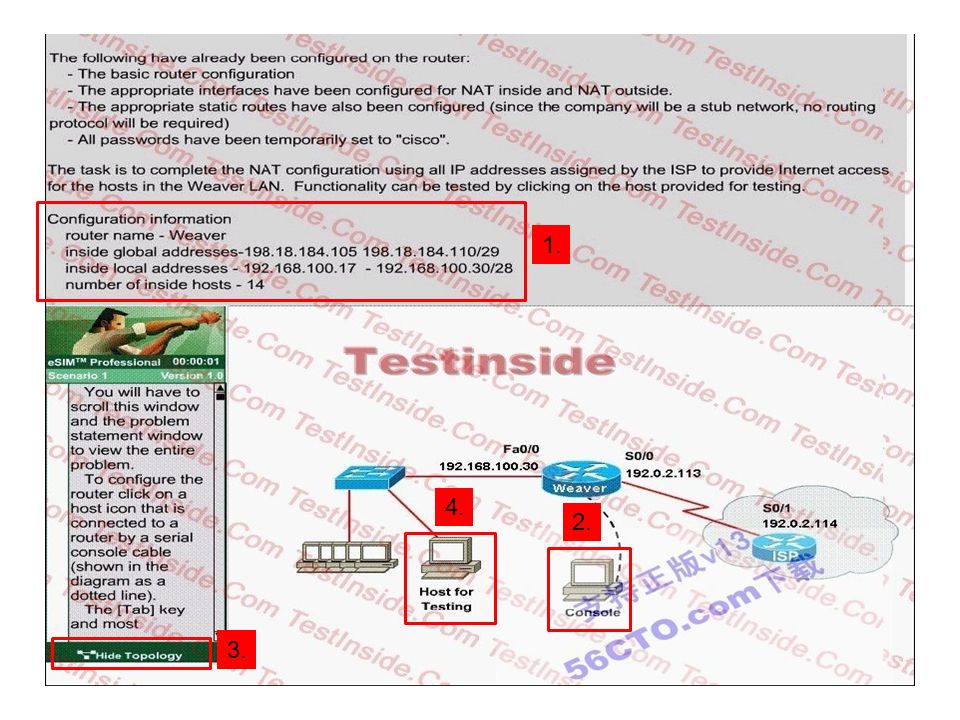
1. 2. 4. 3.
2
NAT/PAT Simulation 구성입니다. Step1. Console 을 통해 Weaver 라우터에 접속한다. Step2. Toplogy 위에 적혀있는 정보에 맞게 구성한다. Step3. 라우터에서 copy run star 명령을 통해 저장을 한다. Step4. Host For Testing 이라고 적혀 있는 PC 에 접속해 Ping Test 를 한다. 구성시 주의사항 : 1. 구성을 하지 않고 Next 를 눌러 다음 Page 로 넘어가면 다시 BACK 으로 되돌릴수 없으니 주의해야 한다. 2. Hide Topology ( 왼쪽 밑부분 ) 누르면 구성하다가 다시 Topology 를 볼 수 있다. 3. 구성시 암호가 소문자이기 때문에 키보드에 Caps Lock 을 O ff 하시고, 또한 한 / 영 키가 영어로 되어 있어야 한다.
 누르면 구성하다가 다시 Topology 를 볼 수 있다. 3. 구성시 암호가 소문자이기 때문에 키보드에 Caps Lock 을 O ff 하시고, 또한 한 / 영 키가 영어로 되어 있어야 한다..")
3
구성 Command >> ++++++++++++++++++++++++++++++++++++++++++++++++ Router>en password:***** <- 암호는 cisco 이다. Router#config terminal Router(config)#hostname Weaver Weaver(config)#ip nat pool test 198.18.184.105 198.18.184.110 netmask 255.255.255.248 Weaver(config)#access-list 1 permit 192.168.100.16 0.0.0.15 Weaver(config)#ip nat inside source list 1 pool test overload Weaver(config)#interface serial 0/0 Weaver(config-if)#ip nat outside Weaver(config-if)#exit Weaver(config-if)#interface fastethernet 0/0 Weaver(config-if)#ip nat inside Weaver(config-if)#end Weaver#copy running-config startup-config ++++++++++++++++++++++++++++++++++++++++++++++++ 위 구성이 완료 되면 Host For Testing 를 클릭하여 Ping Test 를 한다. 목적지는 ISP 주소 192.0.2.114 C:>ping 192.0.2.114 Reply from 192.0.2.114: bytes=32 time=3ms TTL=64 Reply from 192.0.2.114: bytes=32 time=1ms TTL=64 위와같이 응답이 오면 구성이 완료됩니다.
#hostname Weaver Weaver(config)#ip nat pool test netmask Weaver(config)#access-list 1 permit Weaver(config)#ip nat inside source list 1 pool test overload Weaver(config)#interface serial 0/0 Weaver(config-if)#ip nat outside Weaver(config-if)#exit Weaver(config-if)#interface fastethernet 0/0 Weaver(config-if)#ip nat inside Weaver(config-if)#end Weaver#copy running-config startup-config 위 구성이 완료 되면 Host For Testing 를 클릭하여 Ping Test 를 한다. 목적지는 ISP 주소 C:>ping Reply from : bytes=32 time=3ms TTL=64 Reply from : bytes=32 time=1ms TTL=64 위와같이 응답이 오면 구성이 완료됩니다..")
5
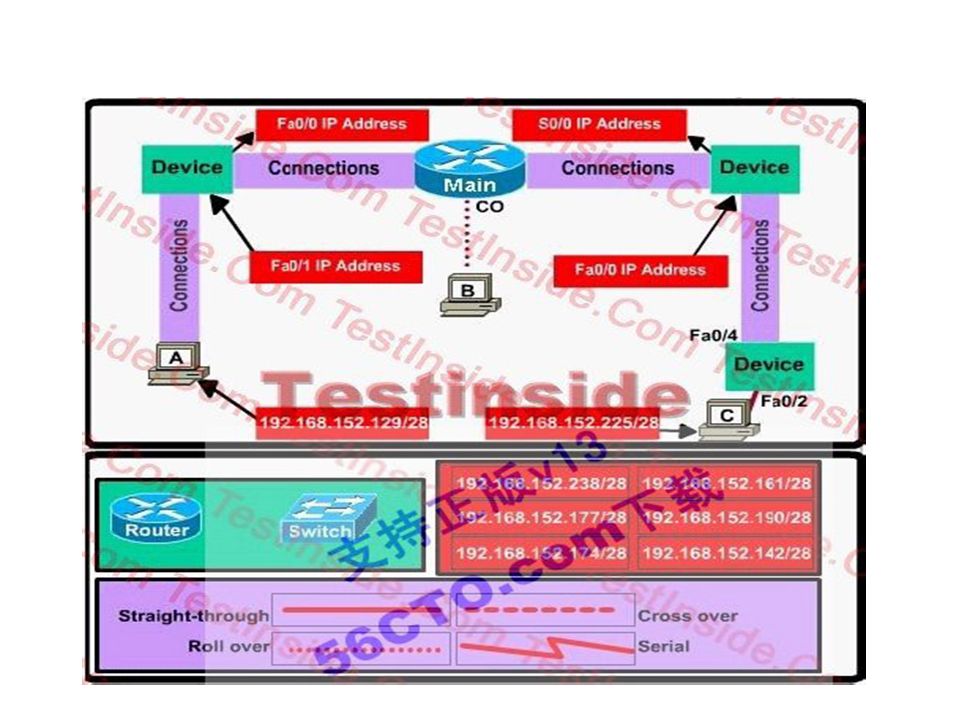
이번 Simulation 은 많은 사항을 요구한다. 시험 LAB Step 을 보면 어떠한 방식으로 하라고 제시하게 되는데 이에 맞게 설정하는 문 제이다. 1. Device 를 Drag & Drop 을 통해 배치한다. 2. Cable 을 Connection 한다.(Drag & Drop) 3. Subnet 을 할당한다.(Drag & Drop) 4. 배치한 Device 에 Console 접속 후 IP 설정 및 Consoel,VTY,Privilege password 를 각각 설정한다. 5. Interface 에 no shutdown 을 통해 활성화를 한다. 6. 각 장비에 sh ip int brief 를 통해 Interface Status 와 Protocol 이 UP 인지 확인한다. ※ 위 Simulation 설정시 Main 위치에 있는 라우터는 sh ip route 또는 conf t 같은 명령어가 실행 되지 않는다. 하지만, 양 옆 라우 터는 설정이 가능하기 때문에 이를 유념하여 설정하면 된다. 많은 사항을 요구하는 만큼 차근차근 설정하면 된다.
 3. Subnet 을 할당한다.(Drag & Drop) 4. 배치한 Device 에 Console 접속 후 IP 설정 및 Consoel,VTY,Privilege password 를 각각 설정한다. 5. Interface 에 no shutdown 을 통해 활성화를 한다. 6. 각 장비에 sh ip int brief 를 통해 Interface Status 와 Protocol 이 UP 인지 확인한다. ※ 위 Simulation 설정시 Main 위치에 있는 라우터는 sh ip route 또는 conf t 같은 명령어가 실행 되지 않는다. 하지만, 양 옆 라우 터는 설정이 가능하기 때문에 이를 유념하여 설정하면 된다. 많은 사항을 요구하는 만큼 차근차근 설정하면 된다..")
6
1. Device 를 Drag & Drop 을 통해 배치한다.

7
2. Cable 을 Connection 한다.(Drag & Drop)
")
8
3. Subnet 을 할당한다.(Drag & Drop)
")
9
MAIN-Router Main#show ip interface brief Main#show running-config Left-RouterRight-Router L-Router>enable L-Router#conf t L-Router(config)#line console 0 L-Router(config-line)#login L-Router(config-line)#password xxx L-Router(config-line)#exit L-Router(config)#line vty 0 4 L-Router(config-line)#login L-Router(config-line)#password xxx L-Router(config-line)#exit L-Router(config)#enable password xxx L-Router(config)#interface fastethernet 0/0 L-Router(config-if)#ip add x.x.x.x x.x.x.x L-Router(config-if)#no sh L-Router(config-if)#exit L-Router(config)#interface fastethernet 0/1 L-Router(config-if)#ip add x.x.x.x x.x.x.x L-Router(config-if)#no sh L-Router(config-if)#end L-Router#show ip int brief L-Router#copy run start R-Router>enable R-Router#conf t R-Router(config)#line console 0 R-Router(config-line)#login R-Router(config-line)#password xxx R-Router(config-line)#exit R-Router(config)#line vty 0 4 R-Router(config-line)#login R-Router(config-line)#password xxx R-Router(config-line)#exit R-Router(config)#enable password xxx R-Router(config)#interface fastethernet 0/0 R-Router(config-if)#ip add x.x.x.x x.x.x.x R-Router(config-if)#no sh R-Router(config-if)#exit R-Router(config)#interface serial 0/0 R-Router(config-if)#ip add x.x.x.x x.x.x.x R-Router(config-if)#no sh R-Router(config-if)#end R-Router#show ip int brief R-Router#copy run start
#line console 0 L-Router(config-line)#login L-Router(config-line)#password xxx L-Router(config-line)#exit L-Router(config)#line vty 0 4 L-Router(config-line)#login L-Router(config-line)#password xxx L-Router(config-line)#exit L-Router(config)#enable password xxx L-Router(config)#interface fastethernet 0/0 L-Router(config-if)#ip add x.x.x.x x.x.x.x L-Router(config-if)#no sh L-Router(config-if)#exit L-Router(config)#interface fastethernet 0/1 L-Router(config-if)#ip add x.x.x.x x.x.x.x L-Router(config-if)#no sh L-Router(config-if)#end L-Router#show ip int brief L-Router#copy run start R-Router>enable R-Router#conf t R-Router(config)#line console 0 R-Router(config-line)#login R-Router(config-line)#password xxx R-Router(config-line)#exit R-Router(config)#line vty 0 4 R-Router(config-line)#login R-Router(config-line)#password xxx R-Router(config-line)#exit R-Router(config)#enable password xxx R-Router(config)#interface fastethernet 0/0 R-Router(config-if)#ip add x.x.x.x x.x.x.x R-Router(config-if)#no sh R-Router(config-if)#exit R-Router(config)#interface serial 0/0 R-Router(config-if)#ip add x.x.x.x x.x.x.x R-Router(config-if)#no sh R-Router(config-if)#end R-Router#show ip int brief R-Router#copy run start")
Similar presentations


 Windows7 PE CD 를 삽입 합니다. 2) BISO 설정에서 부팅순서를 CD-ROM 또는 USB 를 1 순위로 올려준다. 3) 부팅이 될 때 까지 기 달려요.>")


 인터넷주소(강남구보건소)로 접속해주세요.>")


>")

>")

