Download presentation
Presentation is loading. Please wait.

1
CHAP 18. 멀티미디어

2
안드로이드의 멀티미디어 지원 멀티미디어 재생->MediaPlayer 클래스를 사용
멀티미디어 녹화-> MediaRecorder 클래스를 사용

3
안드로이드 지원 파일 형식 종류 형식/코덱 엔코더 디코더 지원파일종류(파일확장자) 오디오 AAC LC/LTP •
3GPP (.3gp) 와 MPEG-4 (.mp4, .m4a). raw AAC (.aac)는 지원하지 않음 HE-AACv1 (AAC+) HE-AACv2 (enhanced AAC+) AMR-NB 3GPP (.3gp) AMR-WB MP3 MP3 (.mp3) MIDI Type 0과 1 (.mid, .xmf, .mxmf). RTTTL/RTX (.rtttl, .rtx), OTA (.ota)와 iMelody (.imy) Ogg Vorbis Ogg (.ogg) PCM/WAVE WAVE (.wav) 이미지 JPEG JPEG (.jpg) GIF GIF (.gif) PNG PNG (.png) BMP BMP (.bmp) 비디오 H.263 3GPP (.3gp) 와 MPEG-4 (.mp4) H.264 AVC MPEG-4 SP VP8 WebM (.webm)
 와 MPEG-4 (.mp4, .m4a). raw AAC (.aac)는 지원하지 않음. HE-AACv1 (AAC+) HE-AACv2. (enhanced AAC+) AMR-NB. 3GPP (.3gp) AMR-WB. MP3. MP3 (.mp3) MIDI. Type 0과 1 (.mid, .xmf, .mxmf). RTTTL/RTX (.rtttl, .rtx), OTA (.ota)와 iMelody (.imy) Ogg Vorbis. Ogg (.ogg) PCM/WAVE. WAVE (.wav) 이미지. JPEG. JPEG (.jpg) GIF. GIF (.gif) PNG. PNG (.png) BMP. BMP (.bmp) 비디오. H GPP (.3gp) 와 MPEG-4 (.mp4) H.264 AVC. MPEG-4 SP. VP8. WebM (.webm)")
4
오디오 재생 2가지의 방법 인텐트 사용 MediaPlayer 클래스 사용

5
(1) 인텐트를 사용하는 방법 public class AudioPlay1Activity extends Activity public void onCreate(Bundle savedInstanceState) { super.onCreate(savedInstanceState); setContentView(R.layout.main); Button playButton = (Button) findViewById(R.id.play); playButton.setOnClickListener(new OnClickListener() { public void onClick(View v) { Intent intent =new Intent(Intent.ACTION_VIEW); Uri uri = Uri.parse("file:///sdcard/old_pop.mp3"); intent.setDataAndType(uri, "audio/mp3"); startActivity(intent); } });
 { super.onCreate(savedInstanceState); setContentView(R.layout.main); Button playButton = (Button) findViewById(R.id.play); playButton.setOnClickListener(new OnClickListener() { public void onClick(View v) { Intent intent =new Intent(Intent.ACTION_VIEW); Uri uri = Uri.parse( file:///sdcard/old_pop.mp3 ); intent.setDataAndType(uri, audio/mp3 ); startActivity(intent); } });")
6
실행 결과

7
(2) MediaPlayer 클래스를 사용한 오디오 예제
 MediaPlayer 클래스를 사용한 오디오 예제")
8
코드 작성 public class AudioPlay2Activity extends Activity { MediaPlayer mp = null; EditText public void onCreate(Bundle savedInstanceState) { super.onCreate(savedInstanceState); setContentView(R.layout.main); edit = (EditText) findViewById(R.id.path); } public void startResAudio(View v) { mp = MediaPlayer.create(this, R.raw.old_pop); mp.start(); public void stopResAudio(View v) { if (mp != null) { mp.stop(); mp.release(); mp = null;
 { super.onCreate(savedInstanceState); setContentView(R.layout.main); edit = (EditText) findViewById(R.id.path); } public void startResAudio(View v) { mp = MediaPlayer.create(this, R.raw.old_pop); mp.start(); public void stopResAudio(View v) { if (mp != null) { mp.stop(); mp.release(); mp = null;")
9
코드 작성 public void startFileAudio(View v) { String file; file = edit.getText().toString(); mp = new MediaPlayer(); try { mp.setDataSource(file); mp.prepare(); } catch (Exception e) { e.printStackTrace(); } mp.start(); public void stopFileAudio(View v) { if (mp != null) { mp.stop(); mp.release(); mp = null;
 { String file; file = edit.getText().toString(); mp = new MediaPlayer(); try { mp.setDataSource(file); mp.prepare(); } catch (Exception e) { e.printStackTrace(); } mp.start(); public void stopFileAudio(View v) { if (mp != null) { mp.stop(); mp.release(); mp = null;")
10
실행 결과

11
오디오 녹음 2가지의 방법 인텐트 사용 MediaRecorder 클래스 사용

12
MediaRecorder를 사용하여서 오디오 녹음

13
예제

14
실행 결과

15
이미지 캡처 2가지의 방법 인텐트 사용 Camera 클래스 사용

16
예제: 인텐트를 이용한 이미지 획득

17
사용자 인터페이스 작성 <?xml version="1.0" encoding="utf-8"?> <LinearLayout xmlns:android=" android:layout_width="match_parent" android:layout_height="match_parent"> <Button android:layout_height="wrap_content" android:layout_width="wrap_content" android:text="캡처" /> android:text="처리" /> <ImageView android:layout_height="match_parent" /> </LinearLayout>

18
코드 작성 public class ImageCapture1Activity extends Activity { private static final int CAMERA_CAPTURE = public void onCreate(Bundle savedInstanceState) { super.onCreate(savedInstanceState); setContentView(R.layout.main); setRequestedOrientation(ActivityInfo.SCREEN_ORIENTATION_LANDSCAPE); Button captureButton = (Button) findViewById(R.id.capture); Button processButton = (Button) findViewById(R.id.process); captureButton.setOnClickListener(new OnClickListener() { public void onClick(View v) { Intent i = new Intent( android.provider.MediaStore.ACTION_IMAGE_CAPTURE); i.putExtra(android.provider.MediaStore.EXTRA_OUTPUT, Uri.fromFile(new File("/sdcard/image.jpg"))); startActivityForResult(i, CAMERA_CAPTURE); } });
 { super.onCreate(savedInstanceState); setContentView(R.layout.main); setRequestedOrientation(ActivityInfo.SCREEN_ORIENTATION_LANDSCAPE); Button captureButton = (Button) findViewById(R.id.capture); Button processButton = (Button) findViewById(R.id.process); captureButton.setOnClickListener(new OnClickListener() { public void onClick(View v) { Intent i = new Intent( android.provider.MediaStore.ACTION_IMAGE_CAPTURE); i.putExtra(android.provider.MediaStore.EXTRA_OUTPUT, Uri.fromFile(new File( /sdcard/image.jpg ))); startActivityForResult(i, CAMERA_CAPTURE); } });")
19
코드 작성 processButton.setOnClickListener(new OnClickListener() { public void onClick(View v) { Bitmap captureBmp = null; File file = new File("/sdcard/image.jpg"); try { captureBmp = Images.Media.getBitmap(getContentResolver(), Uri.fromFile(file)); } catch (FileNotFoundException e) { e.printStackTrace(); } catch (IOException e) { } int width = captureBmp.getWidth(); int height = captureBmp.getHeight(); Bitmap tmpBmp = captureBmp.copy(Bitmap.Config.ARGB_8888, true); for (int y = 0; y < height; y++) { for (int x = 0; x < width; x++) { int value = captureBmp.getPixel(x, y); if (value < 0xff808080) tmpBmp.setPixel(x, y, 0xff000000); else tmpBmp.setPixel(x, y, 0xffffffff); ImageView imgView = (ImageView) findViewById(R.id.imageview); imgView.setImageBitmap(tmpBmp); });
 { public void onClick(View v) { Bitmap captureBmp = null; File file = new File( /sdcard/image.jpg ); try { captureBmp = Images.Media.getBitmap(getContentResolver(), Uri.fromFile(file)); } catch (FileNotFoundException e) { e.printStackTrace(); } catch (IOException e) { } int width = captureBmp.getWidth(); int height = captureBmp.getHeight(); Bitmap tmpBmp = captureBmp.copy(Bitmap.Config.ARGB_8888, true); for (int y = 0; y < height; y++) { for (int x = 0; x < width; x++) { int value = captureBmp.getPixel(x, y); if (value < 0xff808080) tmpBmp.setPixel(x, y, 0xff000000); else tmpBmp.setPixel(x, y, 0xffffffff); ImageView imgView = (ImageView) findViewById(R.id.imageview); imgView.setImageBitmap(tmpBmp); });")
20
코드 작성 @Override protected void onActivityResult(int requestCode, int resultCode, Intent intent) { Bitmap captureBmp = null; if (resultCode == RESULT_OK && requestCode == CAMERA_CAPTURE) { File file = new File("/sdcard/image.jpg"); try { captureBmp = Images.Media.getBitmap(getContentResolver(), Uri.fromFile(file)); } catch (FileNotFoundException e) { e.printStackTrace(); } catch (IOException e) { } ImageView imgView = (ImageView) findViewById(R.id.imageview); imgView.setImageBitmap(captureBmp);
 { Bitmap captureBmp = null; if (resultCode == RESULT_OK && requestCode == CAMERA_CAPTURE) { File file = new File( /sdcard/image.jpg ); try { captureBmp = Images.Media.getBitmap(getContentResolver(), Uri.fromFile(file)); } catch (FileNotFoundException e) { e.printStackTrace(); } catch (IOException e) { } ImageView imgView = (ImageView) findViewById(R.id.imageview); imgView.setImageBitmap(captureBmp);")
21
실행 결과

22
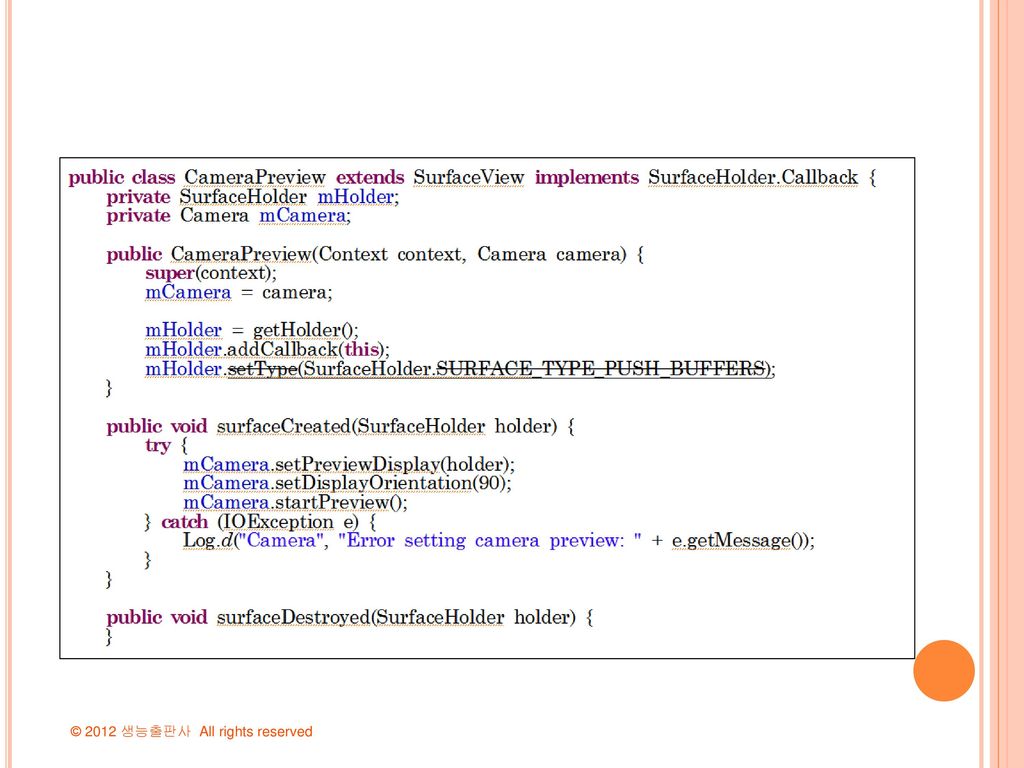
Camera 클래스를 이용한 영상 캡처 만약 안드로이드에서 기본적으로 제공하는 카메라 서비스를 이용하지 않고 자신만의 카메라 애플리케 이션을 작성하고자 한다면 Camera 클래스를 이용하 면 된다. Camera 클래스를 이용하면 이미지 캡처 설정 변경, 이미지 프리뷰, 비디오에서 프레임 추출 등을 할 수 있다. 자세한 절차는 교과서를 참고하세요!

23
사용자 인터페이스 작성

24
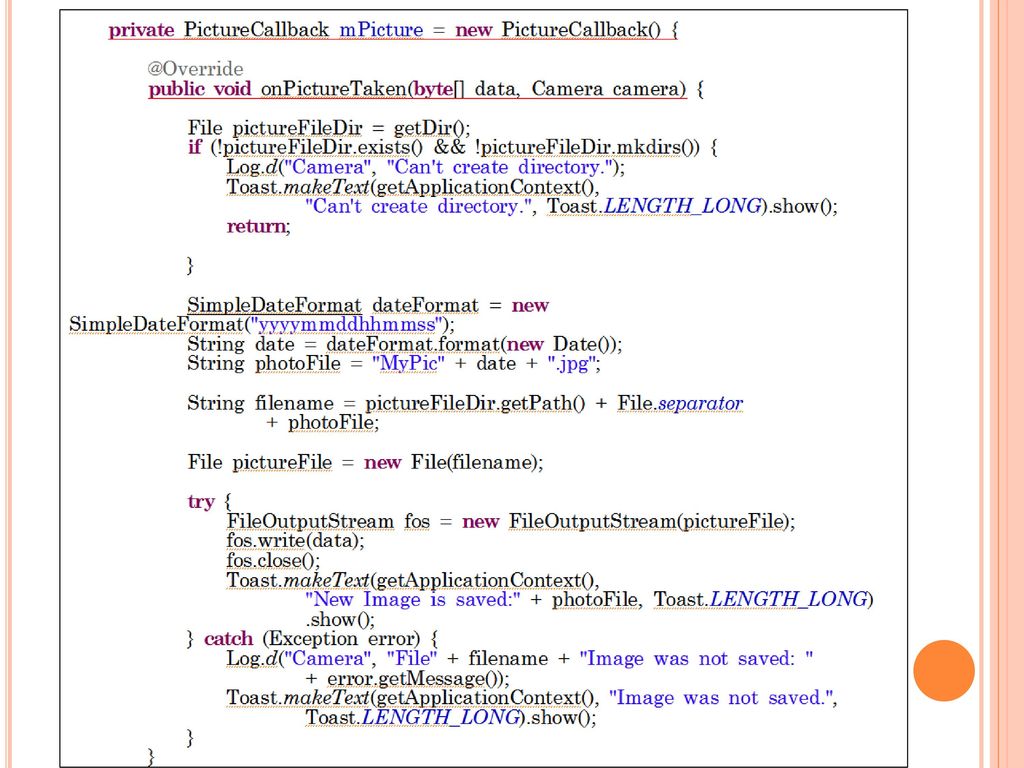
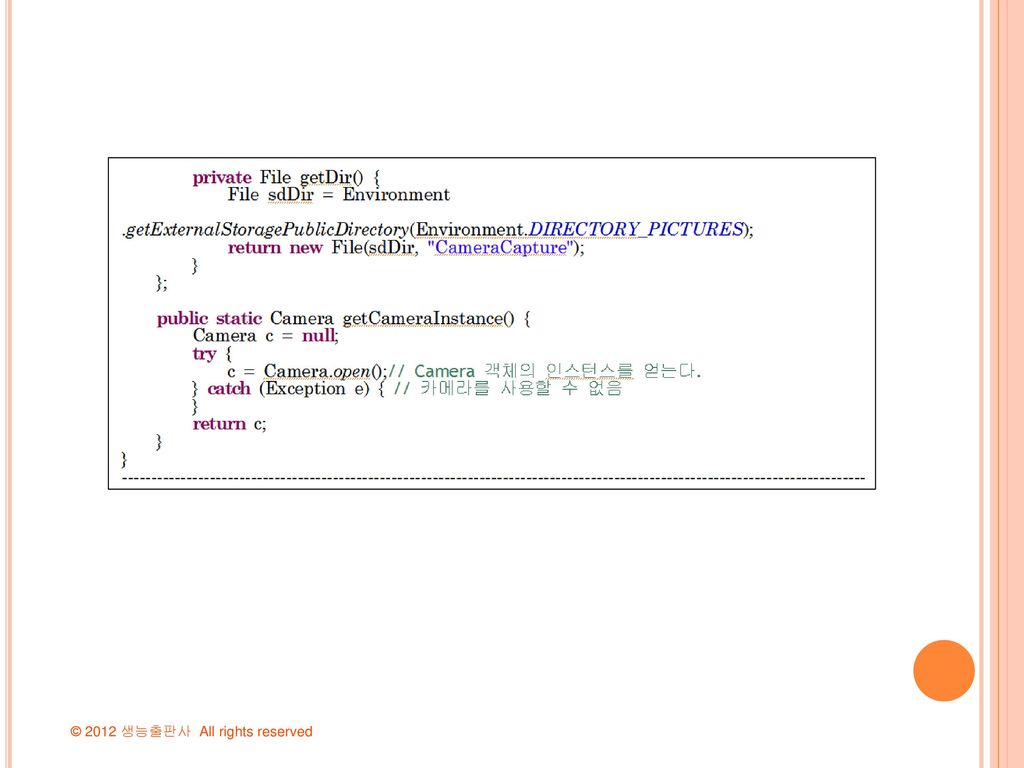
핵심 코드

28
매니페스트 파일

29
실행 결과 갤럭시 S3에서는 \Phone\Pictures\CameraCapture 폴더에 MyPic 와 같은 이름으로 저장된다.

30
내장 사진 선택하기 ACTION_PICK 인텐트에 다음과 같은 URI를 주면 된 다. // 내장 메모리
android.provider.MediaStore.Images.Media.INTERNAL_CONTENT_URI; // 외장 메모리 android.provider.MediaStore.Images.Media.EXTERNAL_CONTENT_URI;

31
예제 실행 화면

32
비디오 재생 MediaPlayer 클래스는 오디오 재생 뿐만 아니라 비 디오 재생도 담당
VideoView 클래스는 MediaPlayer 객체의 생성과 초 기화를 담당한다.

33
예제: 비디오 재생

34
사용자 인터페이스 작성 <?xml version="1.0" encoding="utf-8"?> <LinearLayout xmlns:android=" android:orientation="vertical" android:layout_width="match_parent" android:layout_height="match_parent" > <VideoView android:layout_width="wrap_content" android:layout_height="wrap_content" /> </LinearLayout>

35
코드 작성 public class VideoPlayActivity extends Activity public void onCreate(Bundle savedInstanceState) { super.onCreate(savedInstanceState); this.setContentView(R.layout.main); VideoView videoview = (VideoView)this.findViewById(R.id.videoview); MediaController mc = new MediaController(this); videoview.setMediaController(mc); String folder = Environment.getExternalStorageDirectory().getAbsolutePath(); //videoview.setVideoURI(Uri.parse(" videoview.setVideoPath(folder + "/trailer.mp4"); videoview.requestFocus(); videoview.start(); }
 { super.onCreate(savedInstanceState); this.setContentView(R.layout.main); VideoView videoview = (VideoView)this.findViewById(R.id.videoview); MediaController mc = new MediaController(this); videoview.setMediaController(mc); String folder = Environment.getExternalStorageDirectory().getAbsolutePath(); //videoview.setVideoURI(Uri.parse( )); videoview.setVideoPath(folder + /trailer.mp4 ); videoview.requestFocus(); videoview.start(); }")
36
실행 결과

37
비디오 녹화 MediaRecorder 클래스: 비디오 녹화 담당 SurfaceView : 캠코더의 화면을 표시

38
사용자 인터페이스 작성 <?xml version="1.0" encoding="utf-8"?> <LinearLayout xmlns:android=" android:layout_width="match_parent" android:layout_height="match_parent" android:orientation="vertical" > <SurfaceView android:layout_height="400dp" /> <Button android:layout_height="wrap_content" android:text="녹화시작" android:textSize="12dp" /> </LinearLayout>

39
코드 작성 public class VideoRecordActivity extends Activity implements SurfaceHolder.Callback { Button myButton; MediaRecorder mediaRecorder; SurfaceHolder surfaceHolder; boolean public void onCreate(Bundle savedInstanceState) { super.onCreate(savedInstanceState); is_recording = false; mediaRecorder = new MediaRecorder(); initMediaRecorder(); setContentView(R.layout.main); SurfaceView myVideoView = (SurfaceView) findViewById(R.id.videoview); surfaceHolder = myVideoView.getHolder(); surfaceHolder.addCallback(this); myButton = (Button) findViewById(R.id.mybutton); myButton.setOnClickListener(myButtonOnClickListener); }
 { super.onCreate(savedInstanceState); is_recording = false; mediaRecorder = new MediaRecorder(); initMediaRecorder(); setContentView(R.layout.main); SurfaceView myVideoView = (SurfaceView) findViewById(R.id.videoview); surfaceHolder = myVideoView.getHolder(); surfaceHolder.addCallback(this); myButton = (Button) findViewById(R.id.mybutton); myButton.setOnClickListener(myButtonOnClickListener); }")
40
코드 작성 private Button.OnClickListener myButtonOnClickListener = new Button.OnClickListener() { public void onClick(View arg0) { if (is_recording) { mediaRecorder.stop(); mediaRecorder.release(); finish(); } else { mediaRecorder.start(); is_recording = true; myButton.setText("녹화중지"); } }; public void surfaceChanged(SurfaceHolder arg0, int arg1, int arg2, int arg3) { public void surfaceCreated(SurfaceHolder arg0) { prepareMediaRecorder(); public void surfaceDestroyed(SurfaceHolder arg0) {
 { public void onClick(View arg0) { if (is_recording) { mediaRecorder.stop(); mediaRecorder.release(); finish(); } else { mediaRecorder.start(); is_recording = true; myButton.setText( 녹화중지 ); } }; public void surfaceChanged(SurfaceHolder arg0, int arg1, int arg2, int arg3) { public void surfaceCreated(SurfaceHolder arg0) { prepareMediaRecorder(); public void surfaceDestroyed(SurfaceHolder arg0) {")
41
코드 작성 private void initMediaRecorder() { mediaRecorder.setAudioSource(MediaRecorder.AudioSource.DEFAULT); mediaRecorder.setVideoSource(MediaRecorder.VideoSource.DEFAULT); CamcorderProfile camcorderProfile_HQ = CamcorderProfile .get(CamcorderProfile.QUALITY_LOW); mediaRecorder.setProfile(camcorderProfile_HQ); mediaRecorder.setOutputFile("/sdcard/video.mp4"); mediaRecorder.setMaxDuration(60000); // 최대 시간을 60초로 한정한다. mediaRecorder.setMaxFileSize( ); // 최대 파일 크기를 5MB로 한정한다. } private void prepareMediaRecorder() { mediaRecorder.setPreviewDisplay(surfaceHolder.getSurface()); try { mediaRecorder.prepare(); } catch (IllegalStateException e) { e.printStackTrace(); } catch (IOException e) {
 { mediaRecorder.setAudioSource(MediaRecorder.AudioSource.DEFAULT); mediaRecorder.setVideoSource(MediaRecorder.VideoSource.DEFAULT); CamcorderProfile camcorderProfile_HQ = CamcorderProfile .get(CamcorderProfile.QUALITY_LOW); mediaRecorder.setProfile(camcorderProfile_HQ); mediaRecorder.setOutputFile( /sdcard/video.mp4 ); mediaRecorder.setMaxDuration(60000); // 최대 시간을 60초로 한정한다. mediaRecorder.setMaxFileSize( ); // 최대 파일 크기를 5MB로 한정한다. } private void prepareMediaRecorder() { mediaRecorder.setPreviewDisplay(surfaceHolder.getSurface()); try { mediaRecorder.prepare(); } catch (IllegalStateException e) { e.printStackTrace(); } catch (IOException e) {")
42
실행 결과

Similar presentations


>")


 A n d r o i d.>")


 2 Unlocking Android 안드로이드 패키지 (2/2) 3.>")


에서 제공하는 강의 교안입니다.>")