Download presentation
Presentation is loading. Please wait.

1
어서와 Java는 처음이지! 제19장 데이터베이스 프로그래밍

2
데이터베이스

3
자바와 데이터베이스 JDBC(Java Database Connectivity)는 자바 API의 하나로서 데이터베이스에 연결하여서 데이터베이스 안의 데이터에 대하여 검색하고 데이터를 변경할 수 있게 한다.
는 자바 API의 하나로서 데이터베이스에 연결하여서 데이터베이스 안의 데이터에 대하여 검색하고 데이터를 변경할 수 있게 한다.")
4
JDBC를 통하여 데이터베이스에 연결되면 그 다음 에는 SQL 명령어를 데이터베이스에 전달하면 됩니다.
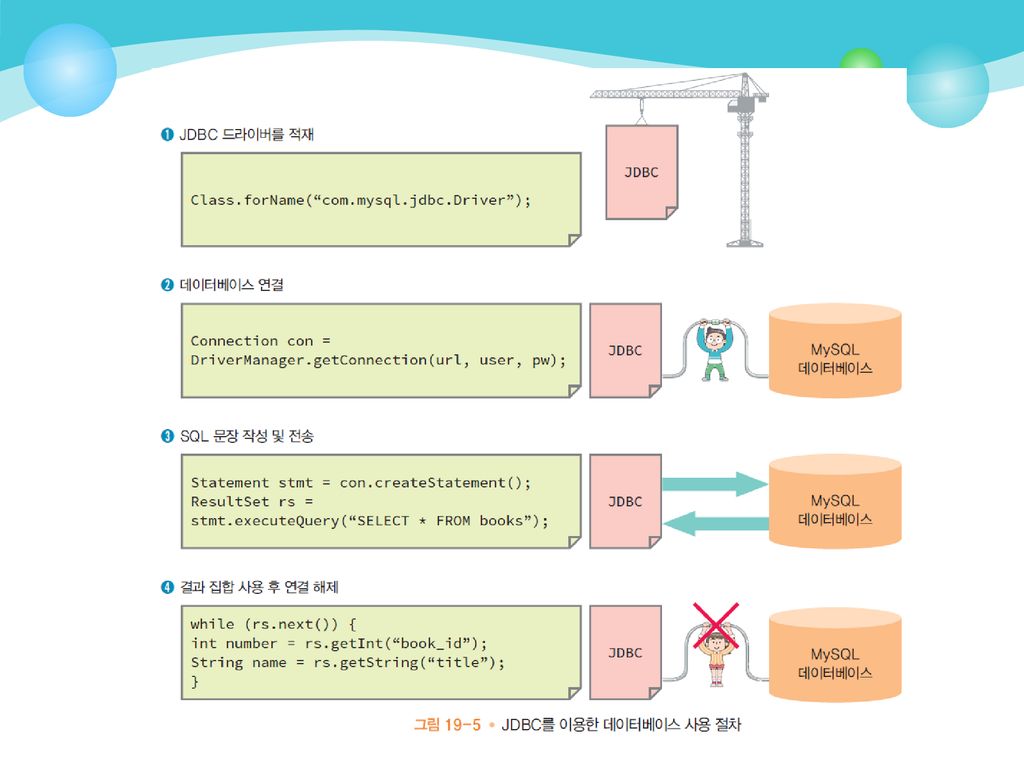
데이터베이스 프로그램 개발 절차 ① DBMS(DataBase Management System)를 설치 ② 자신이 설치한 DBMS에 필요한 JDBC 드라이버를 설치한다. ③ JDBC가 제공하는 기능을 이용하여 데이터베이스 응용 프로그램을 개발한다. JDBC를 통하여 데이터베이스에 연결되면 그 다음 에는 SQL 명령어를 데이터베이스에 전달하면 됩니다.
를 설치. ② 자신이 설치한 DBMS에 필요한 JDBC 드라이버를 설치한다. ③ JDBC가 제공하는 기능을 이용하여 데이터베이스 응용 프로그램을 개발한다. JDBC를 통하여 데이터베이스에 연결되면 그 다음 에는 SQL 명령어를 데이터베이스에 전달하면 됩니다.")
5
예제 IP 주소: 125.209.222.142 public class host2ip {
public static void main ( String[] args ) throws IOException String hostname = " try InetAddress address = InetAddress.getByName(hostname); System.out.println("IP 주소: " + address.getHostAddress()); } catch ( UnknownHostException e ) System.out.println(hostname + "의 IP 주소를 찾을 수 없습니다. " ); IP 주소:
 throws IOException. String hostname = ; try. InetAddress address = InetAddress.getByName(hostname); System.out.println( IP 주소: + address.getHostAddress()); } catch ( UnknownHostException e ) System.out.println(hostname + 의 IP 주소를 찾을 수 없습니다. ); IP 주소:")
6
데이터베이스란? 관계형 데이터베이스(database)는 데이터를 여러 개의 테이블에 나누어서 저장한다.
가장 많이 사용되는 DBMS 오라클, 마이크로소프트의 SQL Server, 사이베이스, MySQL

7
테이블 테이블의 하나의 행(row)은 레코드(record)라고 불린다. 이 레코드는 여러 개의 컬럼(column)으로 이루어져 있고, 테이블은 무결성 법칙을 따라서 작성되어야 한다
으로 이루어져 있고, 테이블은 무결성 법칙을 따라서 작성되어야 한다.")
8
MySQL MySQL은 에서 다운로드

9
SQL이란? 관계형 데이터베이스에서 사용하기 위하여 설계된 언어

10
MySQL에서 SQL 실행하기 MySQL은 다음과 같은 명령어 행 클라이언트를 가지고 있다.

11
데이터베이스 생성하기

12
레코드 추가하기

13
레코드 검색하기

14
검색시 조건 지정

15
정렬하려면

16
레코드 수정하기

17
레코드 삭제하기

18
결과 집합과 커서 쿼리의 조건을 만족하는 레코드들의 집합이 결과 집합(result set)이다.
커서(cursor)는 결과 집합의 레코드들을 포함하고 있는 파일에 대한 포인터 레코드 커서 ….. ..… ….. ..… ….. ..… ….. ..… 결과 집합
는 결과 집합의 레코드들을 포함하고 있는 파일에 대한 포인터. 레코드. 커서. ….. ..… ….. ..… ….. ..… ….. ..… 결과 집합.")
19
JDBC 드라이버 설치 1. 드라이버를 다운로드받아서 압축을 푼다. 2. 다음은 자바 가상 기계가 이 드라이버 파일을 찾을 수 있도록 하여야 한다. 클래스 경로를 나타내는 환경 변수인 CLASSPATH를 변경 또는 압축된 아카이브 파일을 jre/lib/ext 디렉토리에 복사

21
지정된 이름의 클래스를 찾아서 메모리로 적재한다.
드라이버 클래스 적재 try { Class.forName("com.mysql.jdbc.Driver"); } catch (ClassNotFoundException e) { System.out.println("드라이버를 찾을 수 업습니다“); 지정된 이름의 클래스를 찾아서 메모리로 적재한다.
; } catch (ClassNotFoundException e) { System.out.println( 드라이버를 찾을 수 업습니다 ); 지정된 이름의 클래스를 찾아서 메모리로 적재한다.")
22
사용자 아이디와 패스워드를 사용하여 데이터베이스에 연결.
데이터베이스 연결 String url = “jdbc:mysql://localhost/book_db”; String user = “root”; String password = “password”; con = DriverManager.getConnection(url, user, password); 사용자 아이디와 패스워드를 사용하여 데이터베이스에 연결.
; 사용자 아이디와 패스워드를 사용하여 데이터베이스에 연결.")
23
데이터베이스 연결 예제 import java.sql.*; public class ConnectDatabase {
public static Connection makeConnection() { String url = "jdbc:mysql://localhost/book_db"; String id = "root"; String password = "password"; Connection con = null; try { Class.forName("com.mysql.jdbc.Driver"); System.out.println("드라이버 적재 성공"); con = DriverManager.getConnection(url, id, password); System.out.println("데이터베이스 연결 성공"); } catch (ClassNotFoundException e) { System.out.println("드라이버를 찾을 수 없습니다."); } catch (SQLException e) { System.out.println("연결에 실패하였습니다."); } return con;
 { String url = jdbc:mysql://localhost/book_db ; String id = root ; String password = password ; Connection con = null; try { Class.forName( com.mysql.jdbc.Driver ); System.out.println( 드라이버 적재 성공 ); con = DriverManager.getConnection(url, id, password); System.out.println( 데이터베이스 연결 성공 ); } catch (ClassNotFoundException e) { System.out.println( 드라이버를 찾을 수 없습니다. ); } catch (SQLException e) { System.out.println( 연결에 실패하였습니다. ); } return con;")
24
데이터베이스 연결 예제 드라이버 적재 성공 데이터베이스 연결 성공
public static void main(String arg[]) throws SQLException { Connection con = makeConnection(); } 드라이버 적재 성공 데이터베이스 연결 성공
 throws SQLException { Connection con = makeConnection(); } 드라이버 적재 성공. 데이터베이스 연결 성공.")
25
SQL 문장 수행

26
SQL 문장 수행 Statement s = con.createStatement(); // 문장 객체 생성
String select = “SELECT * FROM books ORDER BY book_id”; // SQL 문장 생성 ResultSet rows = s.executeQuery(select); // SQL 문장 실행 SQL문장을 실행하고 결과 집합을 반환한다.
; // SQL 문장 실행. SQL문장을 실행하고 결과 집합을 반환한다.")
27
데이터베이스 연결 예제 import java.sql.*; public class SQLSelectTest {
public static Connection makeConnection() { ... // 앞의 코드와 동일 } public static void main(String arg[]) throws SQLException { Connection con = makeConnection(); Statement stmt = con.createStatement(); ResultSet rs = stmt.executeQuery("SELECT * FROM books"); while (rs.next()) { int id = rs.getInt("book_id"); String title = rs.getString("title"); System.out.println(id + " " + title); 결과 집합에서 다음 레코드로 이동한다. 현재 레코드에서 필드의 값을 가져온다.
 { ... // 앞의 코드와 동일. } public static void main(String arg[]) throws SQLException { Connection con = makeConnection(); Statement stmt = con.createStatement(); ResultSet rs = stmt.executeQuery( SELECT * FROM books ); while (rs.next()) { int id = rs.getInt( book_id ); String title = rs.getString( title ); System.out.println(id + + title); 결과 집합에서 다음 레코드로 이동한다. 현재 레코드에서 필드의 값을 가져온다.")
28
실행 결과 드라이버 적재 성공 데이터베이스 연결 성공 1 Operating System Concepts
2 Head First PHP and MYSQL 3 C Programming Language 4 Head First SQL

29
레코드 수정, 삭제 import java.sql.*; public class SQLInsertTest {
public static Connection makeConnection() { ...// 전과 동일 } public static void main(String arg[]) { addBook("Artificial Intellegence", "Addison Wesley", "2002", 35000);
 { ...// 전과 동일. } public static void main(String arg[]) { addBook( Artificial Intellegence , Addison Wesley , 2002 , 35000);")
30
레코드 수정, 삭제 private static void addBook(String title, String publisher, String year, int price) { Connection con = makeConnection(); try { Statement stmt = con.createStatement(); String s = "INSERT INTO books (title, publisher, year, price) VALUES "; s += "('" + title + "','" + publisher + "','" + year + "','" + price + "')"; System.out.println(s); int i = stmt.executeUpdate(s); if (i == 1) System.out.println("레코드 추가 성공"); else System.out.println("레코드 추가 실패"); } catch (SQLException e) { System.out.println(e.getMessage()); System.exit(0); } 레코드를 수정할때 사용.
; String s = INSERT INTO books (title, publisher, year, price) VALUES ; s += ( + title + , + publisher + , + year + , + price + ) ; System.out.println(s); int i = stmt.executeUpdate(s); if (i == 1) System.out.println( 레코드 추가 성공 ); else. System.out.println( 레코드 추가 실패 ); } catch (SQLException e) { System.out.println(e.getMessage()); System.exit(0); } 레코드를 수정할때 사용.")
31
실행 결과 드라이버 적재 성공 데이터베이스 연결 성공
INSERT INTO books (title, publisher, year, price) VALUES ('Artificial Intellegence','Addison Wesley','2002','35000') 레코드 추가 성공
 VALUES ( Artificial Intellegence , Addison Wesley , 2002 , ) 레코드 추가 성공.")
32
LAB: 데이터베이스 레코드 뷰어 작성 다음과 같이 그래픽 사용자 인터페이스를 이용하여 데이터베이스 테이블의 내용을 화면에 표시하는 프로그램을 작성하여 보자.

33
SOLUTION class MyFrame extends JFrame {
JTextField id, title, p, year, price, author; JButton previousButton, nextButton, InsertButton, deleteButton, searchButton; ResultSet rs; Statement stmt; public MyFrame() throws SQLException { super("Database Viewer"); Connection con = makeConnection(); stmt = con.createStatement(); rs = stmt.executeQuery("SELECT * FROM books"); setLayout(new GridLayout(0, 2)); add(new JLabel("ID", JLabel.CENTER)); add(id = new JTextField()); add(new JLabel("TITLE", JLabel.CENTER)); add(title = new JTextField()); add(new JLabel("PUBLISHER", JLabel.CENTER)); add(p = new JTextField()); add(new JLabel("YEAR", JLabel.CENTER)); add(year = new JTextField()); add(new JLabel("PRICE", JLabel.CENTER)); add(price = new JTextField()); add(new JLabel("저자 검색", JLabel.CENTER)); add(author = new JTextField());
 throws SQLException { super( Database Viewer ); Connection con = makeConnection(); stmt = con.createStatement(); rs = stmt.executeQuery( SELECT * FROM books ); setLayout(new GridLayout(0, 2)); add(new JLabel( ID , JLabel.CENTER)); add(id = new JTextField()); add(new JLabel( TITLE , JLabel.CENTER)); add(title = new JTextField()); add(new JLabel( PUBLISHER , JLabel.CENTER)); add(p = new JTextField()); add(new JLabel( YEAR , JLabel.CENTER)); add(year = new JTextField()); add(new JLabel( PRICE , JLabel.CENTER)); add(price = new JTextField()); add(new JLabel( 저자 검색 , JLabel.CENTER)); add(author = new JTextField());")
34
SOLUTION previousButton = new JButton("Previous");
previousButton.addActionListener(new ActionListener() { public void actionPerformed(ActionEvent event) { try { rs.previous(); id.setText("" + rs.getInt("book_id")); title.setText("" + rs.getString("title")); p.setText("" + rs.getString("publisher")); year.setText("" + rs.getString("year")); price.setText("" + rs.getInt("price")); } catch (SQLException e) { e.printStackTrace(); } });
 { public void actionPerformed(ActionEvent event) { try { rs.previous(); id.setText( + rs.getInt( book_id )); title.setText( + rs.getString( title )); p.setText( + rs.getString( publisher )); year.setText( + rs.getString( year )); price.setText( + rs.getInt( price )); } catch (SQLException e) { e.printStackTrace(); } });")
35
SOLUTION nextButton = new JButton("Next");
nextButton.addActionListener(new ActionListener() { public void actionPerformed(ActionEvent event) { try { rs.next(); id.setText("" + rs.getInt("book_id")); title.setText("" + rs.getString("title")); p.setText("" + rs.getString("publisher")); year.setText("" + rs.getString("year")); price.setText("" + rs.getInt("price")); } catch (SQLException e) { e.printStackTrace(); } }); add(nextButton); add(previousButton); setDefaultCloseOperation(JFrame.EXIT_ON_CLOSE); setSize(350, 200); // pack(); setVisible(true);
 { public void actionPerformed(ActionEvent event) { try { rs.next(); id.setText( + rs.getInt( book_id )); title.setText( + rs.getString( title )); p.setText( + rs.getString( publisher )); year.setText( + rs.getString( year )); price.setText( + rs.getInt( price )); } catch (SQLException e) { e.printStackTrace(); } }); add(nextButton); add(previousButton); setDefaultCloseOperation(JFrame.EXIT_ON_CLOSE); setSize(350, 200); // pack(); setVisible(true);")
36
SOLUTION public static Connection makeConnection() {
String url = "jdbc:mysql://localhost/book_db"; String id = "root"; String password = "password"; Connection con = null; try { Class.forName("com.mysql.jdbc.Driver"); System.out.println("드라이버 적재 성공"); con = DriverManager.getConnection(url, id, password); System.out.println("데이터베이스 연결 성공"); } catch (ClassNotFoundException e) { System.out.println("드라이버를 찾을 수 없습니다."); } catch (SQLException e) { System.out.println("연결에 실패하였습니다."); } return con; public class SQLSelectTest { public static void main(String[] args) throws SQLException { new MyFrame();
; System.out.println( 드라이버 적재 성공 ); con = DriverManager.getConnection(url, id, password); System.out.println( 데이터베이스 연결 성공 ); } catch (ClassNotFoundException e) { System.out.println( 드라이버를 찾을 수 없습니다. ); } catch (SQLException e) { System.out.println( 연결에 실패하였습니다. ); } return con; public class SQLSelectTest { public static void main(String[] args) throws SQLException { new MyFrame();")
37
Q & A

Similar presentations


 데이터베이스 연동>")
INVENTORNICS 노창배 소프트웨어 김 경 순>")


